Trimming pottery is a crucial step in the ceramic-making process, imparting refinement and functionality to the final piece. This intricate technique involves carefully shaping and carving excess clay from a dried or partially dried piece on the potter’s wheel. Not only does trimming refine the form and aesthetics of the pottery, but it also ensures uniform wall thickness and balanced weight distribution, vital for both appearance and functionality.
The process demands a steady hand, keen attention to detail, and a mastery of the potter’s wheel. Trimmed pottery exhibits a professional finish, enhancing its overall appeal and functionality, whether it’s a delicate vase, a functional bowl, or an artistic sculpture. In this guide, we’ll delve into how to trim pottery, exploring the techniques, tools, and tips needed to achieve a polished and harmonious result in your ceramic creations.
“To trim pottery, first, center the clay on a potter’s wheel and start it spinning. Then, use trimming tools like a metal or wooden rib to carefully remove excess clay from the exterior of the pot while shaping it, creating a refined and even surface.”
Table of Contents
Tools and Materials Required for Pottery Trimming
To begin pottery trimming, you will need a few essential tools. These include a trimming tool, which can be made of metal or wood, and a sponge or water container to keep the clay moist. Other tools that may be useful include a needle tool for detailing and a rib for smoothing.
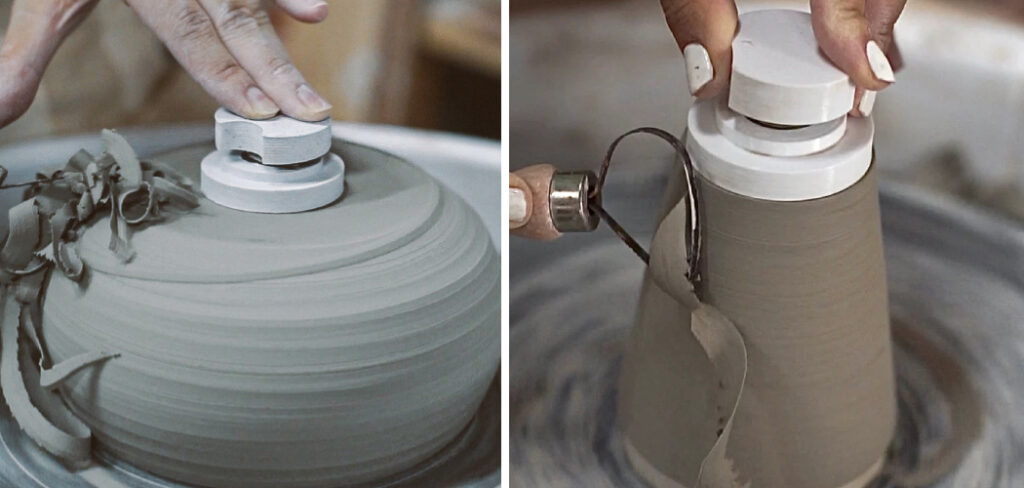
There are different types of trimming tools available, each with its own purpose. A loop tool is commonly used for removing larger amounts of clay, while a straight tool is ideal for creating clean lines and edges. A wire tool can be used to cut through the clay, and a chisel tool is great for shaping and carving.
In addition to tools, you will also need some materials for pottery trimming. These include clay, which should be properly prepared and wedged before use. You will also need a pottery wheel to spin the clay while trimming, as well as a bat or wheelhead to hold the clay in place.

Preparing the Pottery for Trimming
Before you can begin trimming, it is important to prepare the clay properly. This involves wedging the clay to remove air bubbles and ensure its consistency. Wedging also helps to align the clay particles, making it easier to work with.
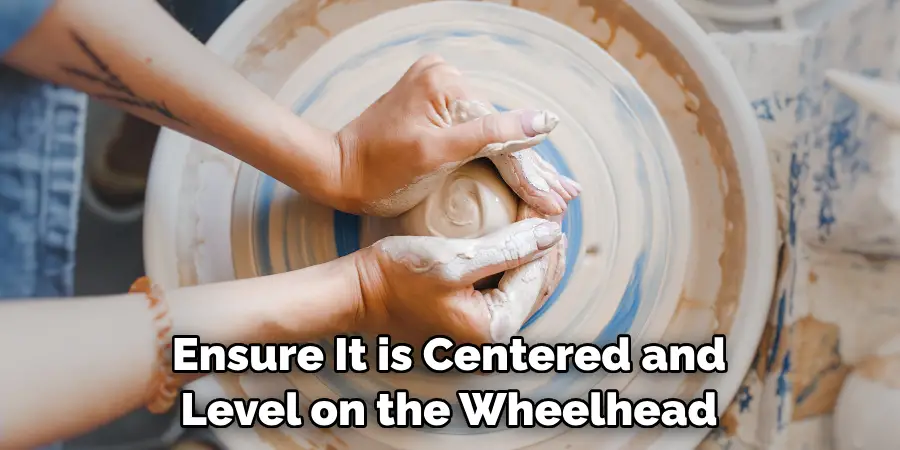
Once the clay is wedged, it can be centered on the pottery wheel. Centering is a crucial step in pottery making, as it ensures that the clay is balanced and stable while being trimmed. To center the clay, place it on the wheelhead and use your hands to apply pressure and push it towards the center. This process may take some practice, but with time, you will be able to center the clay effortlessly.
After centering the clay, you can shape it into the desired form before trimming. This can be done by using your hands or tools to create the basic shape of the pottery. It is important to ensure that the walls of the pottery are even and smooth before moving on to trimming.
10 Steps How to Trim Pottery
Step 1: Prepare Your Workstation
Before diving into the actual trimming process, it’s essential to set up a conducive workspace. Ensure your pottery wheel is clean and in good working condition. Have all the necessary tools within reach, such as trimming tools, a sponge, a bucket of water, and any other supplies you might need.
Step 2: Allow the Pottery to Dry to Leather Hard Stage
Trimming is most effective when the pottery has reached the leather hard stage. This stage is when the clay is firm enough to hold its shape but still soft enough to be carved and trimmed easily. It’s crucial to let your pottery dry to this state to achieve the desired results during the trimming process.
Step 3: Secure the Pottery on the Wheel
Once your pottery is at the leather hard stage, place it securely on the center of the pottery wheel. Ensure it is centered and level on the wheelhead. You can use clay or padding to stabilize the pottery if needed. The goal is to have a steady base to work on during the trimming process.
Step 4: Mark the Foot Ring
Using a pencil or a needle tool, mark the area on the base of the pottery where you want the foot ring to be. The foot ring is the trimmed portion of the base that provides stability and a finished look to the piece. Make sure the marked area is even and follows the desired shape and size.
Step 5: Begin Trimming the Foot Ring
Start trimming the foot ring using appropriate trimming tools like loop tools or chisels. Begin by removing excess clay from the marked area, working your way inward. Be cautious not to trim too much at once; it’s better to take small amounts off and check frequently to ensure you’re achieving the desired shape and thickness.
Step 6: Create a Beveled Edge
As you trim the foot ring, consider creating a beveled edge. This edge not only enhances the aesthetics of the pottery but also adds stability. Gently angle the trimming tool towards the center of the foot ring, gradually creating a slanted or beveled edge that meets the bottom surface of the pottery.
Step 7: Check Thickness and Shape Regularly
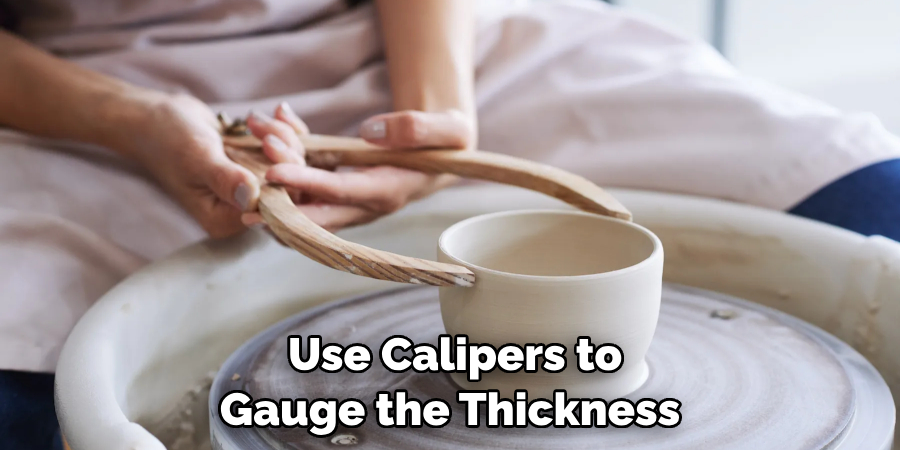
During the trimming process, frequently check the thickness and shape of the foot ring. Use calipers or your fingers to gauge the thickness, aiming for an even and consistent base. Adjust the trimming as needed to achieve the desired thickness and shape for both the foot ring and the base.
Step 8: Smooth and Shape the Sides
After shaping the foot ring, focus on smoothing and shaping the sides of the pottery. Use the appropriate trimming tools to refine the overall form, remove any imperfections, and achieve a polished look. Ensure the sides of the pottery are even and harmoniously shaped.
Step 9: Add Decorative Elements (Optional)
If desired, this is the stage where you can add decorative elements to the trimmed area. Carve patterns, textures, or other designs to personalize and enhance the aesthetic appeal of your pottery. Use your creativity and the trimming tools to achieve the desired decorative effects.
Step 10: Finish and Clean Up
Once you are satisfied with the trimmed pottery, carefully remove it from the wheel. Clean up any excess clay and residue using a sponge and water. Allow the pottery to dry completely before proceeding to the next stages of the ceramic-making process, such as bisque firing and glazing.
Common Mistakes to Avoid While Trimming Pottery
While trimming pottery, there are some common mistakes that beginners often make. One of these is applying too much pressure while trimming, which can cause the clay to crack or break. It is important to apply gentle and consistent pressure to avoid damaging the pottery.
Another common mistake is not keeping the clay moist during trimming. Dry clay can be difficult to work with and may result in rough or uneven trims. To avoid this, make sure to keep a sponge or water container nearby and moisten the clay as needed.
Tips for Achieving Smooth and Even Trims
To achieve smooth and even trims, there are a few tips that can be helpful. First, it is important to maintain consistency in trimming. This means applying the same amount of pressure and using the same technique throughout the trimming process. Consistency helps to create a uniform look and ensures that the foot and rim of the pottery are even.
Another tip is to take your time while trimming. Rushing through the process can lead to mistakes and uneven trims. It is important to be patient and focus on each cut, ensuring that it is precise and clean.
Finishing Touches: Smoothing and Polishing the Trimmed Pottery
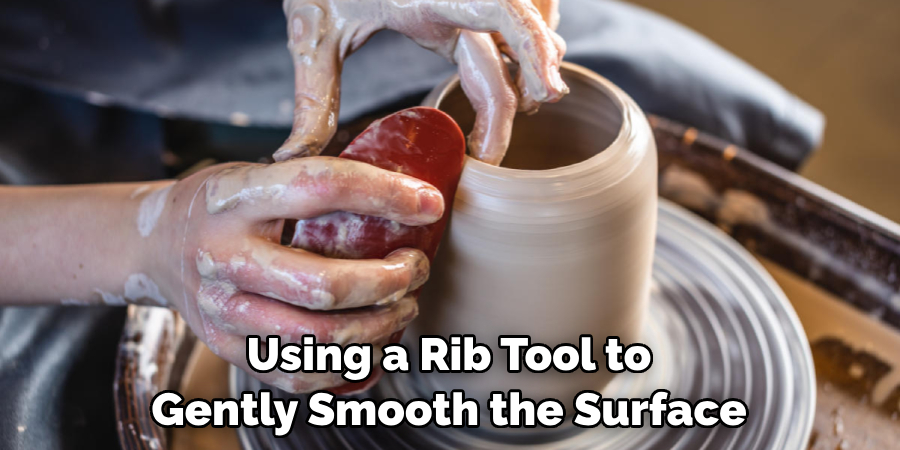
After trimming, it is important to smooth and polish the pottery to give it a finished look. This can be done by using a rib tool or sponge to gently smooth the surface of the pottery. It is important to be gentle while smoothing, as applying too much pressure can distort the shape of the pottery.
Polishing can be done by using a soft cloth or chamois leather to rub the surface of the pottery. This helps to remove any remaining roughness and gives the pottery a smooth and polished appearance.
Conclusion
Pottery trimming is an essential skill for any potter. It adds refinement and precision to the pottery, enhancing its aesthetic appeal. By mastering the techniques of pottery trimming, you can create beautiful and functional pieces of art. It is important to practice and experiment with different techniques to improve your skills. Don’t be afraid to make mistakes and learn from them.
With time and dedication, you can become a master of pottery trimming and create unique and stunning pieces of pottery. So, grab your tools and clay, and start trimming! Follow these simple instructions outlined in this blog post about how to trim pottery, and you’ll be able to get the job done with ease.


