Painting bisque ceramics offers a delightful canvas for creativity, allowing artists and hobbyists to infuse life into plain, fired clay pieces. Whether you’re looking to craft functional kitchenware or decorative art, understanding the nuances of painting bisque ceramics is essential. This intricate art form combines skill, patience, and imagination to transform blank ceramic surfaces into unique, vibrant works of art.
In this comprehensive guide, we will explore how to paint bisque ceramics step by step. From selecting the right materials and planning your design to mastering painting techniques and navigating the firing process, you will gain invaluable insights into this fascinating art form. Whether you’re a seasoned ceramic artist or a beginner eager to explore your artistic potential, this article will provide you with the knowledge and inspiration needed to embark on a creative journey with bisque ceramics.
“To paint bisque ceramics, first ensure they are clean and dry. Then, apply ceramic glaze or acrylic paint in thin, even layers, allowing each layer to dry before adding more.”
Table of Contents
10 Steps How to Paint Bisque Ceramics
Step 1: Gather Your Materials
Before you start painting bisque ceramics, ensure you have all the necessary materials. You’ll need bisque-fired ceramic pieces, ceramic paints, brushes, water, a palette, paper towels, and a kiln for firing.
Step 2: Choose Your Ceramic Pieces
Select the bisque ceramics you want to paint. They can range from mugs and plates to figurines and vases. Make sure they are clean and free from dust or debris.
Step 3: Prepare Your Workspace
Set up a clean, well-ventilated workspace with ample lighting. Cover your work surface with a drop cloth or newspaper to catch any spills and protect your work area.
Step 4: Plan Your Design
Before diving into painting, plan your design. You can sketch it on paper or directly onto the ceramic piece using a pencil. Think about colors, patterns, and any special techniques you want to use.
Step 5: Select Your Paints
Choose ceramic paints that are compatible with bisque firing. These paints are specifically designed for ceramics and will withstand the high temperatures of the kiln. They come in various colors and can be either underglaze or overglaze.

Step 6: Mixing and Diluting Paints
Depending on your design, you may need to mix and dilute paints to achieve the desired colors and consistency. Use a palette to mix colors and adjust their thickness with water.
Step 7: Apply Base Coats
Start by applying base coats to your ceramic piece. This serves as a foundation for your design. Apply multiple coats if necessary, allowing each layer to dry before proceeding.
Step 8: Paint Your Design
Use your planned design as a guide and begin painting. Be patient and work slowly, using various brush sizes for different details. Allow each color to dry before adding additional layers or details.
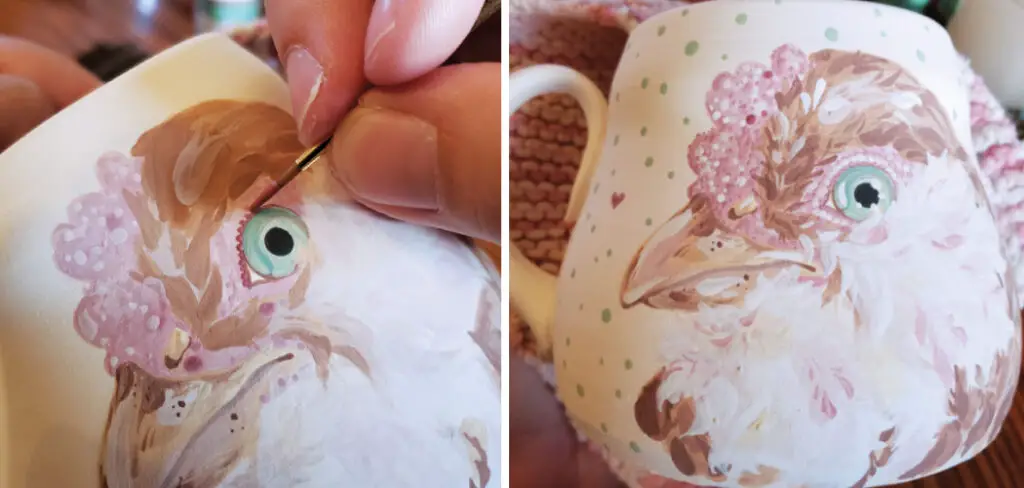
Step 9: Add Details and Accents
Once your base design is complete, add details and accents. This is where you can get creative with intricate patterns, shading, and fine lines. Take your time to ensure precision.
Step 10: Allow for Drying and Firing
After completing your painting, allow the ceramic piece to dry completely. The drying time varies depending on the paint and atmospheric conditions. Once dry, carefully load your ceramics into a kiln and follow the manufacturer’s instructions for firing. Firing temperatures can range from 1600°F to 1900°F (870°C to 1040°C) for bisque ceramics, and it’s crucial to follow recommended firing schedules.
Tips for Achieving a Smooth and Even Finish
To achieve a smooth and even finish when painting bisque ceramics, there are several tips and techniques that you can follow. First, it is important to use proper brush strokes. This means applying the paint in one direction and avoiding going back and forth, as this can create streaks and uneven coverage. It is also important to apply consistent pressure when painting to ensure an even application of paint.
To avoid drips and smudges, it is recommended to apply thin layers of paint and allow each layer to dry before applying the next. This will help to prevent the paint from pooling or running. If you do encounter any drips or smudges, you can gently sand them away once the paint has dried.

Adding Details and Accents to Your Bisque Ceramics
Once you have applied the base coat and achieved a smooth and even finish, you can start adding details and accents to your bisque ceramics. For intricate details, it is recommended to use fine brushes. These brushes have a smaller tip and allow for more precise control. You can use them to add fine lines, dots, or other small details to your ceramics.
To add texture to your ceramics, you can use different tools such as sponges, stamps, or even toothpicks. These tools can create interesting patterns and textures on the surface of the ceramics. Another way to add accents to your bisque ceramics is by using metallic paints. These paints can create a shiny and reflective finish, adding a touch of elegance to your pieces.
Curing and Sealing Your Painted Bisque Ceramics
After you have finished painting your bisque ceramics, it is important to cure and seal them to ensure the longevity of the paint. Curing involves allowing the paint to fully dry and harden. This can take anywhere from a few hours to a few days, depending on the type of paint used. Once the paint is fully cured, you can apply a sealant or varnish to protect the surface and prevent the paint from chipping or fading.
When choosing a sealant or varnish, it is important to use one that is compatible with the type of paint you have used. Some sealants may cause the paint to crack or peel, so it is important to read the instructions carefully and choose a product that is specifically designed for use on ceramics.
Troubleshooting Common Painting Issues
While painting bisque ceramics can be a fun and rewarding activity, it is not without its challenges. There are several common issues that you may encounter when painting bisque ceramics, such as cracking or peeling paint, uneven coverage, or a blotchy or streaky finish.
To prevent cracking or peeling paint, it is important to ensure that the ceramics are properly cleaned and prepared before painting. Any dust or dirt on the surface can prevent the paint from adhering properly. It is also important to apply thin layers of paint and allow each layer to dry before applying the next. This will help to prevent the paint from cracking or peeling.
To achieve even coverage, it is important to apply the paint in thin and even layers. Avoid applying too much paint at once, as this can result in uneven coverage and drips. It is also important to use proper brush strokes and apply consistent pressure when painting.
If you encounter a blotchy or streaky finish, it may be due to the type of paint or the application technique used. Some paints may require multiple coats to achieve a smooth and even finish. It is also important to ensure that the paint is mixed well before applying it to the ceramics.

Creative Ideas for Painting Bisque Ceramics
Painting bisque ceramics opens up a world of creative possibilities. There are endless ways to personalize and decorate these blank canvases. Here are a few creative ideas to get you started:
Personalizing Mugs and Plates:
Paint your own designs or add names and initials to create personalized mugs and plates. These make great gifts for loved ones or unique additions to your own kitchen.
Creating Unique Home Decor Pieces:
Use bisque ceramics to create unique home decor pieces such as vases, candle holders, or decorative bowls. Paint them in colors and patterns that match your home decor for a cohesive look.
Making Gifts for Loved Ones:
Painted bisque ceramics make thoughtful and personalized gifts for loved ones. You can create custom pieces that reflect their interests, hobbies, or favorite colors.
Conclusion and Final Thoughts
Painting bisque ceramics is a fun and creative activity that allows you to add your own personal touch to these blank canvases. By following the proper preparation techniques, choosing the right paint, and using the appropriate painting techniques, you can achieve a smooth and even finish on your bisque ceramics. Adding details and accents, curing and sealing the paint, and troubleshooting common painting issues will ensure that your painted bisque ceramics last for years to come. Hopefully, this article gave you some helpful tips about how to paint bisque ceramics successfully, so now that you have the proper knowledge on how to get the job done, why not give it a try today?
