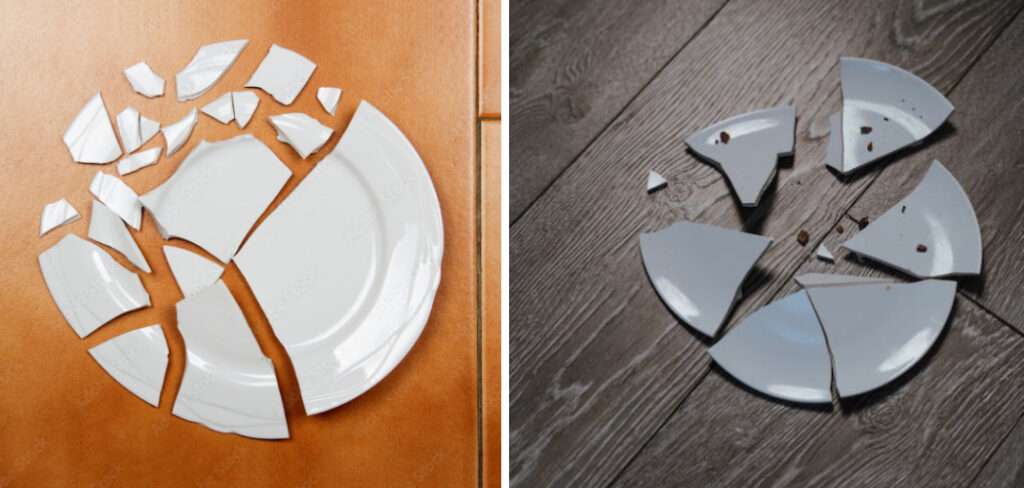
Accidents happen, and a broken ceramic plate doesn’t have to signal the end of its usefulness. Whether it’s a cherished heirloom or a part of your everyday dinnerware, knowing how to repair a broken ceramic plate can save you from the disappointment of losing a favorite piece. In this guide, we’ll explore how to repair broken ceramic plate.
From selecting the right adhesive to properly aligning the pieces and ensuring a seamless finish, we’ll provide a step-by-step approach to help you restore your plate to its former glory. Discovering the art of ceramic plate repair not only allows you to salvage sentimental items but also encourages sustainable practices by minimizing unnecessary waste. Whether you’re a DIY enthusiast or someone looking to preserve the beauty of your ceramics, mastering the skills of plate repair can be a rewarding and valuable endeavor.
Table of Contents
Significance of Repairing Broken Ceramic Plates
Ceramic plates are a common household item that is often used for serving food, displaying decorative items or simply as dinnerware. Due to their delicate nature, these plates can easily break or chip if not handled with care. While it may seem like a small issue, a broken ceramic plate can cause inconvenience and even pose safety hazards if left unrepaired.
Repairing a broken ceramic plate not only restores its functionality but also helps in preserving its sentimental value and aesthetics. Plus, repairing is a more sustainable option instead of throwing away and buying a new one. In this article, we will discuss the steps involved in repairing a broken ceramic plate and some tips to ensure a successful repair.
List of Materials Needed for Ceramic Plate Repair
Here is a list of materials that will be needed to repair your broken ceramic plate:
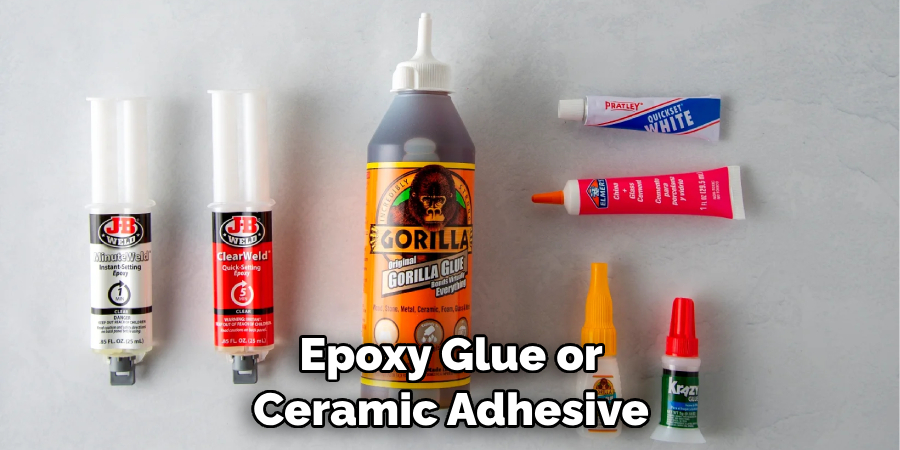
- Epoxy glue or ceramic adhesive: This is the most important material for repairing a broken ceramic plate. It is strong and durable, making it perfect for fixing plates.
- Sandpaper: You will need sandpaper to roughen up the edges of the broken pieces of your ceramic plate. This will help the glue to stick better.
- Acetone or rubbing alcohol: These solvents are useful for cleaning the surfaces of your broken ceramic plate before applying the adhesive.
- Paper towels or cloth: You will need these materials to clean up any excess adhesive and to wipe down the repaired plate once it is dry.
- Clamps or tape: These will be used to hold the broken pieces of your ceramic plate together while the adhesive dries.
- Toothpicks or popsicle sticks: These can be useful for applying the adhesive to small or hard-to-reach areas of your ceramic plate.
9 Methods How to Repair Broken Ceramic Plate
1. Super Glue
One of the easiest and most common methods to repair a broken ceramic plate is by using super glue. This method works best for small, clean breaks where the pieces fit back together perfectly. Simply apply a small amount of super glue to one piece, press the pieces together firmly, and hold for a few minutes until the glue sets. Be sure to use a glue that is specifically designed for ceramics.
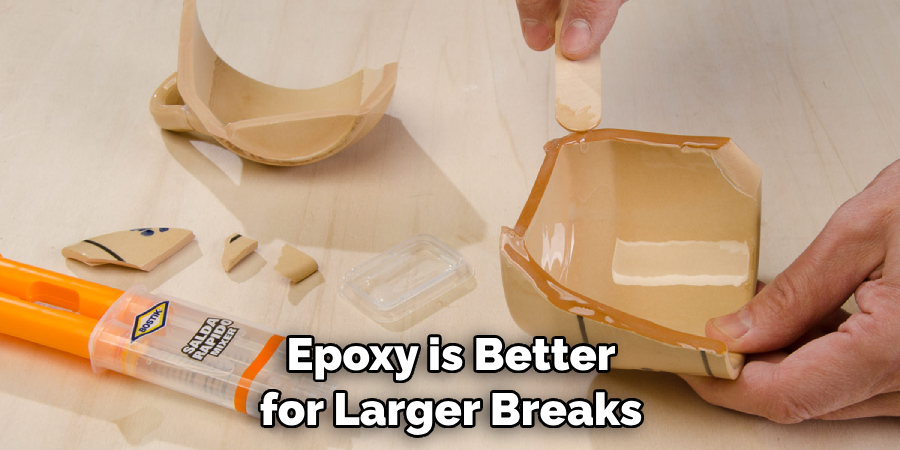
2. Epoxy Resin
Epoxy resin is another strong adhesive that can be used to repair broken ceramic plates. This method is better suited for larger or more complex breaks as it provides a stronger bond than super glue. Mix equal parts of epoxy resin and hardener, then apply it to both sides of the broken pieces before pressing them together. Hold the pieces in place for at least 5 minutes to allow the epoxy resin to set. Once it has fully dried, sand down any excess glue and paint over with ceramic paint to blend in with the rest of the plate.
3. Ceramic Repair Kit
If you want a more professional approach, consider purchasing a ceramic repair kit specifically designed for fixing broken plates. These kits usually come with all the necessary materials and instructions to ensure a successful repair. However, they can be more expensive than DIY methods and may not always be readily available.
4. Baking Soda and Super Glue
For stronger adhesion, mix baking soda with super glue until it forms a paste-like consistency. Apply this mixture to one side of the break, then press the pieces together firmly. Hold the pieces in place for about a minute until the glue sets. Then, use a damp cloth to wipe away any excess baking soda. This method is best for smaller, clean breaks on ceramic plates.
5. Clear Nail Polish
Clear nail polish can also work as an adhesive for repairing small cracks or chips in ceramic plates. Apply multiple coats of nail polish over the damaged area until it is filled in and smooth. Once the nail polish is dry, the repaired area will be protected and water-resistant. However, keep in mind that this method is only suitable for minor repairs and may not be as strong as other adhesive options.
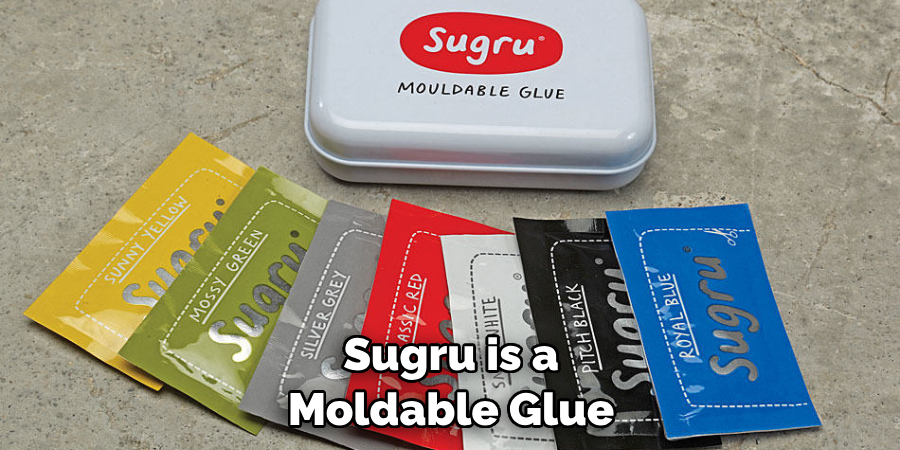
6. Sugru
Sugru is a moldable glue that can be used to fix various household items, including ceramic plates. Simply knead the sugru until soft and pliable, then mold it onto the broken area of your plate. Sugru will dry into a strong, flexible rubber that is dishwasher safe and heat resistant up to 180°C. This makes it a great option for repairing ceramic plates that are often used for serving hot food.
7. Clay
If your plate has missing pieces, you can use clay to fill in the gaps before gluing the pieces back together. Make sure to choose a clay that is safe for food consumption. You can find these in most arts and crafts stores. To use clay as a filler, first clean the edges of the broken pieces with a damp cloth. Then, roll small balls of clay and press them into the gaps between the broken pieces. Use your fingers to blend and smooth out the clay until it is flush with the rest of the plate.
8. Heat
In some cases, applying heat to a broken ceramic plate can help to repair it. Place the broken pieces in a cold oven and then turn on the heat, allowing the oven to warm up gradually. This can help to fuse the pieces back together. Once the oven has reached its maximum temperature, turn it off and let it cool down slowly. This gradual change in temperature can help to minimize any further damage to the plate.
9. Seek Professional Help
If your ceramic plate has sentimental or monetary value, it may be best to seek professional help from a ceramics repair specialist. They have the expertise and materials needed to restore your plate to its original state. However, this can be a very expensive option. So, if your plate is not of great value to you, it may be more cost-effective to attempt the repair yourself.
Carefully Aligning the Broken Pieces
Ceramic plates are a popular choice in many households, whether for everyday use or special occasions. But just like any other kitchenware, they can get damaged over time or due to accidental mishaps. This might leave you wondering if there’s any hope of saving your favorite ceramic plate from the trash bin.
Well, the good news is that depending on the severity of the damage, you can easily repair your broken ceramic plate at home. In this guide, we will walk you through the simple steps of repairing a broken ceramic plate and give you tips on how to prevent future damages.
First things first, before you start any repairs, it’s important to carefully align the broken pieces of your ceramic plate. This step is crucial as it will determine the final result of your repair. Make sure to double check that all pieces are in their correct position and fit seamlessly together. If any piece is missing or too damaged to be used, you can try using a food-safe adhesive to fill in the gaps.
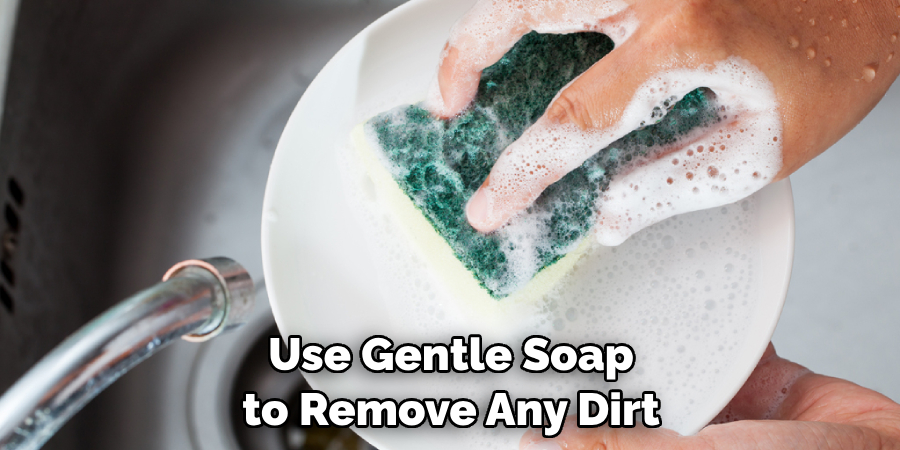
Next, you’ll need to clean and dry the broken pieces of your ceramic plate. Use warm water and gentle soap to remove any dirt, grease or food particles on the surface of the plate. Once cleaned, let it air dry completely before moving on to the next step.
Using Clamps or Rubber Bands to Hold the Pieces in Place
One of the most common methods used to repair broken ceramic plates is by using clamps or rubber bands. This method can be effective for smaller pieces and requires minimal effort.
First, you will need to gather all the broken pieces of your ceramic plate. Make sure to handle them carefully as they can be sharp and may cause injuries. Once you have all the pieces, you will need to clean them thoroughly with warm water and soap. This step is important as it will ensure that the glue adheres to the pieces properly.
Next, apply a small amount of ceramic or super glue on one of the broken pieces and carefully press it against another piece. Hold them in place for a few seconds until they stick together. Repeat this process with all the broken pieces until your plate is fully repaired.
Now comes the tricky part, holding the pieces in place while the glue dries. This is where clamps or rubber bands come into play. You can use small clamps to hold the larger pieces together or wrap rubber bands tightly around the plate to keep the smaller pieces in place. Make sure not to apply too much pressure as it can cause the pieces to shift or break again.
Once you have secured all the pieces in place, leave the plate to dry for at least 24 hours. This will ensure that the glue fully sets and your plate is restored to its original strength. After 24 hours, carefully remove the clamps or rubber bands and check if any additional glue is needed to fill in any gaps.
Things to Consider When Repairing a Broken Ceramic Plate
Ceramic plates are beautiful and useful pieces of tableware that can make any meal feel more special. However, they are also fragile and prone to breaking if mishandled or accidentally dropped. If you have a broken ceramic plate, don’t throw it away just yet. With the right tools and techniques, you can repair it and bring it back to its former glory. In this guide, we will discuss how to repair broken ceramic plates and the things you need to consider before attempting the repair.
Safety First
Before you start repairing your broken ceramic plate, make sure that you have all the necessary safety equipment. This includes gloves, goggles, and a dust mask. Since you will be working with sharp edges and broken pieces of ceramic, you want to protect your hands and eyes from any potential injuries. Additionally, the dust created during the repair process can be harmful if inhaled, so a dust mask is also essential.
Evaluate the Damage
The first thing you need to do when repairing a broken ceramic plate is to assess the damage. Are there any missing pieces? Is the break clean or jagged? Take note of these details as they will affect the repair process. If there are missing pieces, try to find them so you can use them later. If the break is clean, it will be easier to reattach the pieces. However, if it is jagged, you may need to smooth out the edges before proceeding with the repair.
Choosing the Right Adhesive
Choosing the right adhesive is crucial in successfully repairing a broken ceramic plate. There are various types of adhesives available, such as super glue, epoxy, and ceramic-specific adhesives. Super glue is suitable for small chips or cracks, while epoxy is better for larger breaks. Ceramic-specific adhesives are specially formulated for repairing ceramics and are the best option for more delicate repairs.
Repairing Techniques
There are two main techniques for repairing a broken ceramic plate – the “glue” method and the “pinning” method. The glue method involves applying adhesive to both pieces and pressing them together until they bond. This is suitable for clean breaks or small chips.
Conclusion
As we come to the end of this comprehensive guide on how to repair broken ceramic plates, it’s clear that with a little bit of patience and some helpful tips, you can salvage your favorite dishes and prevent them from ending up in the trash. From identifying the type of break to choosing the right adhesive, we’ve covered all the necessary steps for successfully repairing your precious ceramic plates.
So, next time you accidentally drop a plate and see it shatter into pieces, don’t despair! Use our expert advice and put your skills to work. With enough practice, you may even become a pro at fixing broken ceramics. And remember, not all breaks have to mean goodbye forever – sometimes they can result in beautifully unique pieces with character.


