Ceramic Christmas trees have become a beloved holiday decoration for many people around the world. To make a ceramic Christmas tree, mold or sculpt clay into a tree shape, add details, fire it in a kiln, and glaze it for decoration. You can also paint the glazed tree and add lights for a festive touch. The popularity of ceramic Christmas trees can be attributed to their unique and handmade nature, as well as their ability to evoke feelings of warmth and nostalgia. In this blog post, we’ll walk you through the steps on how to make a ceramic Christmas tree so that you can get back to using it in no time!
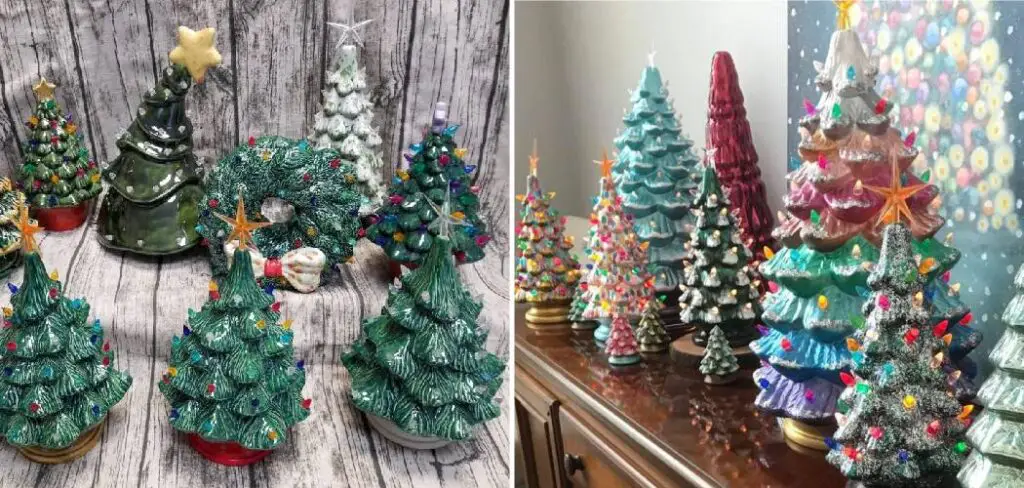
One of the most appealing aspects of ceramic Christmas trees is their handmade quality. Each tree is carefully crafted by hand, making it a truly one-of-a-kind piece. The attention to detail and craftsmanship that goes into creating these trees is evident in their intricate designs and delicate features. From the texture of the tree trunk to the shape and placement of the branches, every aspect of a ceramic Christmas tree is carefully considered and executed.
Table of Contents
Materials Needed: A Comprehensive List
To create your own ceramic Christmas tree, you will need a few essential materials. Here is a comprehensive list of what you will need:
1. Clay: Choose a clay that is suitable for ceramics and can withstand high temperatures.
2. Clay tools: These include a rolling pin, clay cutter, and various shaping tools.
3. Kiln: A kiln is necessary for firing your ceramic tree. If you don’t have access to a kiln, you can consider using air-dry clay instead.
4. Glaze: Glaze is used to add color and shine to your tree. There are many different types and colors of glaze available, so choose one that suits your desired look.
5. Paintbrushes: You will need paintbrushes for applying glaze and any additional paint or detailing you want to add to your tree.
6. Ornaments: If you want to add ornaments to your tree, gather a collection of small decorations such as mini lights, beads, or tiny ornaments.
You can find these materials at your local craft store or online. Many craft stores also offer ceramic classes or workshops where you can learn how to make your own ceramic Christmas tree.
Step-by-Step Guide: How to Make a Ceramic Christmas Tree
Step 1: Plan Your Design
Before diving into the actual crafting process, take some time to plan your ceramic Christmas tree design. Consider the size, style, and overall look you want to achieve. You can go for a traditional evergreen tree or get creative with a more abstract design. Sketch your ideas on paper to help visualize the final product.
Step 2: Prepare Your Workspace
Creating ceramics can be messy, so it’s crucial to set up a dedicated workspace. Cover your work surface with a disposable tablecloth or plastic sheet to make cleanup easier. Ensure you have adequate ventilation if you’re using clay or glaze that emits fumes. Have all your tools and materials within easy reach.
Step 3: Sculpt the Tree
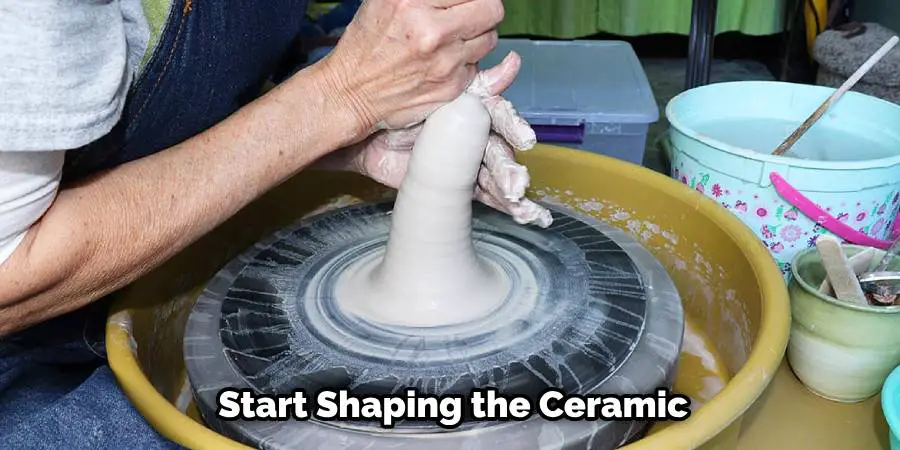
Now it’s time to start shaping the ceramic tree. Begin by taking a portion of your clay and rolling it into a ball. Flatten it to create the base of your tree. From there, start building the tree’s branches. Roll out smaller clay pieces into cones, gradually decreasing in size as you work your way up. Attach them to the base, ensuring they’re securely joined. Use your sculpting tools to add texture and detail to the branches, making them look like pine needles.
Step 4: Create the Tree Trunk
For the tree trunk, use a separate piece of clay to form a cylindrical shape. Attach it to the base of the tree, making sure it’s centered and stable. Add texture and details to the trunk to mimic the appearance of bark.
Step 5: Add Decorative Elements
Before firing the tree, consider adding decorative elements such as tiny ceramic ornaments, bows, or other festive accents. You can also create miniature ceramic presents to place around the base of the tree.
Step 6: Allow for Drying and Pre-firing
Let your ceramic Christmas tree air dry or follow the specific instructions for the type of clay you’re using. This can take several days or longer, depending on the clay and ambient conditions. Once the tree is completely dry, you may choose to do a pre-firing, often called a bisque firing, which strengthens the clay and prepares it for glazing.
Step 7: Glaze or Paint Your Tree

Now it’s time to add color and character to your ceramic tree. You can either glaze or paint it, depending on your preference. If you’re using glaze, carefully apply multiple coats to achieve your desired color and finish. If you’re painting, use ceramic paints and brushes to bring your tree to life. Allow the glaze or paint to dry completely before moving on to the next step.
Step 8: Firing
The final firing process is essential to harden the glaze or paint and give your ceramic Christmas tree its glossy finish. If you’re using a kiln, carefully follow the manufacturer’s instructions for the appropriate firing temperature and duration. If you’re using air-dry clay, this step is unnecessary.
Step 9: Assembly and Lighting
Once your ceramic tree is fully fired and cooled, it’s time to assemble it. Place the tree on the ceramic Christmas tree base and insert the plastic lights into the small holes you created earlier. Arrange the tree’s branches and add any optional ornaments or decorations.
Decorating Your Tree: Ideas for Adding Color and Detail
Once you have created the base, trunk, and branches of your ceramic Christmas tree, it’s time to add color and detail. There are many different ways you can decorate your tree, depending on your personal style and preferences.
One option is to paint the branches with glaze or acrylic paint. Choose a color that complements your overall color scheme and carefully paint each branch. You can also add additional details such as snow or glitter for a festive touch.
Another option is to add ornaments to your tree. Miniature lights, beads, or tiny ornaments can be attached to the branches using glue or wire. This will add a touch of sparkle and whimsy to your tree.

If you prefer a more minimalist look, you can leave your tree unpainted and unadorned. The natural beauty of the ceramic clay will shine through, creating a simple and elegant tree.
Experiment with different colors, designs, and techniques to create a tree that reflects your personal style and adds a festive touch to your holiday decor.
Firing Your Creation: Understanding the Kiln Firing Process
Firing your ceramic Christmas tree is an important step in the creation process. Firing refers to the process of heating the clay to a high temperature in a kiln, which causes the clay to harden and become durable.
Before firing your tree, make sure it is completely dry. Any moisture in the clay can cause it to crack or explode during the firing process. To ensure your tree is dry, let it air dry for several days or use a hairdryer to speed up the drying process.
Once your tree is dry, carefully place it in the kiln. Follow the manufacturer’s instructions for firing temperature and duration. It’s important to note that firing ceramics can be a complex process, so if you are new to ceramics, it may be helpful to take a class or seek guidance from an experienced ceramic artist.
After the firing process is complete, allow your tree to cool completely before handling it. The heat from the kiln can cause the clay to be extremely hot, so use caution when removing your tree from the kiln.
Glazing Your Tree: Techniques for Achieving a Beautiful Finish
Glazing your ceramic Christmas tree is the final step in the creation process. Glaze adds color and shine to your tree, giving it a finished and polished look. There are many different glazing techniques you can use, depending on the look you want to achieve.
One technique is to apply a single coat of glaze to your tree. This will give it a smooth and glossy finish. Use a paintbrush to carefully apply the glaze, making sure to cover the entire surface of the tree. Allow the glaze to dry completely before handling your tree.
Another technique is to apply multiple layers of glaze in different colors. This will create a more textured and dimensional look. Start by applying a base coat of glaze in a color of your choice. Once the base coat is dry, apply additional layers of glaze in different colors, using a sponge or brush to create texture and depth.
Experiment with different glazing techniques and colors to achieve the desired look for your tree. Remember, glaze can dramatically change the appearance of your tree, so take your time and be mindful of the effect you want to achieve.
Conclusion
Creating your own ceramic Christmas tree is a rewarding and fulfilling experience. The process of shaping the clay, adding texture, and glazing the tree allows you to express your creativity and create a unique piece of holiday decor.
Handmade holiday decorations have a special charm and beauty that cannot be replicated by store-bought items. They add a personal touch to your home and create a warm and inviting atmosphere for the holiday season. Hopefully, this article gave you some helpful tips about how to make a ceramic christmas tree successfully, so now that you have the proper knowledge on how to get the job done, why not give it a try today?


