To create skin texture in clay, use tools like brushes, sponges, and sculpting knives. Experiment with various techniques to achieve realism.
Creating realistic skin texture in clay sculpture adds depth and lifelike quality to your artwork. Sculptors often use a combination of tools and methods to mimic the natural irregularities of skin. Brushes can create fine lines, while sponges offer a more subtle texture.
Sculpting knives help carve intricate details. Practicing these techniques ensures that the final piece looks authentic and detailed. Understanding how to manipulate clay to achieve the desired texture is crucial for bringing your sculptures to life. This guide will help you master the essential steps for creating realistic skin texture in clay.
Credit: www.reddit.com
Table of Contents
Introduction To Clay Sculpting
Clay sculpting is a fun and creative activity. Artists use clay to make beautiful sculptures. Sculpting helps express ideas through shapes and textures. One important part of sculpting is creating realistic skin textures. This guide will help you understand how to make skin texture in clay sculptures.
Importance Of Skin Texture
Skin texture adds realism to your clay sculptures. It makes the artwork look lifelike. Smooth skin looks different from rough or wrinkled skin. Adding these details brings your sculpture to life. People will notice the fine details and appreciate your work more.
Basic Tools And Materials
To create skin texture, you need some basic tools. Here is a list of tools and materials:
- Clay: Choose a soft clay that is easy to work with.
- Sculpting Tools: Get tools like knives, needles, and loop tools.
- Texture Tools: Use brushes, sponges, and stamps for adding textures.
- Water: Keep a small bowl of water to smooth the clay.
These tools help you shape and texture the clay. Using the right tools makes your work easier. Each tool has a specific purpose in creating textures.
| Tool | Purpose |
|---|---|
| Knife | Cutting and shaping the clay |
| Needle | Adding fine lines and details |
| Loop Tool | Removing clay and creating hollows |
| Brush | Smoothing and adding fine texture |
| Sponge | Creating rough texture |
Understanding your tools is important. Practice using each tool on a piece of clay. This helps you learn how to create different textures.
Preparing Your Workspace
Before starting on your clay project, it’s crucial to prepare your workspace. A well-organized space enhances creativity and efficiency. Let’s dive into how to set up your workspace for creating stunning skin textures in clay.
Organizing Tools
Keep all your tools within easy reach. An organized set of tools saves time and effort. Here’s a list of essential tools you might need:
- Clay modeling tools
- Sponges
- Wire cutters
- Rolling pins
- Work mats
Use small containers to keep tools sorted. Label each container for quick identification. A clean workspace keeps distractions to a minimum.
Choosing The Right Clay
Different clays have different properties. Choosing the right clay is essential for achieving perfect skin textures.
| Type of Clay | Properties |
|---|---|
| Polymer Clay | Flexible, easily molded, and great for details |
| Air-Dry Clay | Dries naturally, easy to work with, but less durable |
| Ceramic Clay | Strong, durable, and perfect for larger projects |
Choose a clay that suits your project needs. For detailed work, polymer clay is ideal. For larger projects, consider ceramic clay.
Proper workspace preparation is the first step to creating stunning skin textures in clay. Organize your tools and choose the right clay to ensure a smooth, creative process.
Understanding Skin Texture
Creating realistic skin texture in clay can be challenging. But with the right techniques, you can make your sculptures look lifelike. Understanding the anatomy and common patterns of human skin is crucial.
Anatomy Of Human Skin
The human skin has three main layers: the epidermis, dermis, and hypodermis.
| Layer | Description |
|---|---|
| Epidermis | The outermost layer, providing a waterproof barrier. |
| Dermis | The middle layer, containing tough connective tissue, hair follicles, and sweat glands. |
| Hypodermis | The deeper subcutaneous tissue, made of fat and connective tissue. |
Common Texture Patterns
Human skin has various texture patterns. These can be recreated in clay using different techniques. Here are some common patterns:
- Pores: Small openings on the skin surface.
- Wrinkles: Folds or creases, often found around joints.
- Scars: Raised or indented marks from healed wounds.
- Freckles: Small brown spots, usually caused by sun exposure.
To replicate these textures in clay, you can use tools like:
- Needles
- Brushes
- Sponges
- Textured stamps
By understanding these patterns and using the right tools, you can create realistic skin textures in your clay sculptures.
Credit: www.stanwinstonschool.com
Basic Techniques For Skin Texture
Creating skin texture in clay sculptures can be challenging but rewarding. Mastering this skill adds realism to your work. This section covers basic techniques for skin texture. Learn how to use sculpting tools and create realistic pores.
Using Sculpting Tools
Sculpting tools are essential for adding skin texture. Here are some common tools:
- Loop tools: These help in removing small amounts of clay.
- Rake tools: Use these for fine lines and wrinkles.
- Needle tools: Perfect for tiny details and fine textures.
To begin, use a loop tool to shape the surface. Smooth the clay with your fingers or a soft brush. Next, use the rake tool to add lines and wrinkles. Finally, use the needle tool for fine details.
Creating Realistic Pores
Realistic pores make your sculpture lifelike. Follow these steps to create pores:
- Prepare the surface: Smooth the clay with a soft brush.
- Use a stiff brush: Dab the brush to create tiny holes.
- Vary the pressure: Apply different pressure for natural look.
You can also use a toothbrush or sponge. Dip the tool in water before dabbing. This prevents clay from sticking. A needle tool can add individual pores. Randomize the placement for realism.
These techniques will improve your clay sculptures. Practice often to perfect your skills. Happy sculpting!
Advanced Skin Texture Methods
Creating realistic skin textures in clay can be challenging. Advanced methods can help bring your sculptures to life. This guide will cover some techniques.
Layering Techniques
Using layering techniques can add depth to your sculpture. Start by applying a base layer of clay. Then, add thin layers to build up the texture. This helps create a more realistic skin appearance.
Here are some steps:
- Apply a base layer of clay.
- Add thin layers on top.
- Smooth each layer gently.
- Use tools to create small details.
Remember to keep the layers thin. This helps in achieving a lifelike texture.
Incorporating Fine Details
Details make the skin look real. Use fine tools to add tiny details like pores and wrinkles.
Here is a list of tools:
- Needle tools
- Wire loop tools
- Texture stamps
These tools help in creating fine skin details. Apply gentle pressure to avoid damaging the clay.
Using a texture stamp can save time. Press the stamp onto the clay to create detailed patterns quickly.
Combining these methods can make your sculpture look more realistic. Practice and patience are key. Happy sculpting!

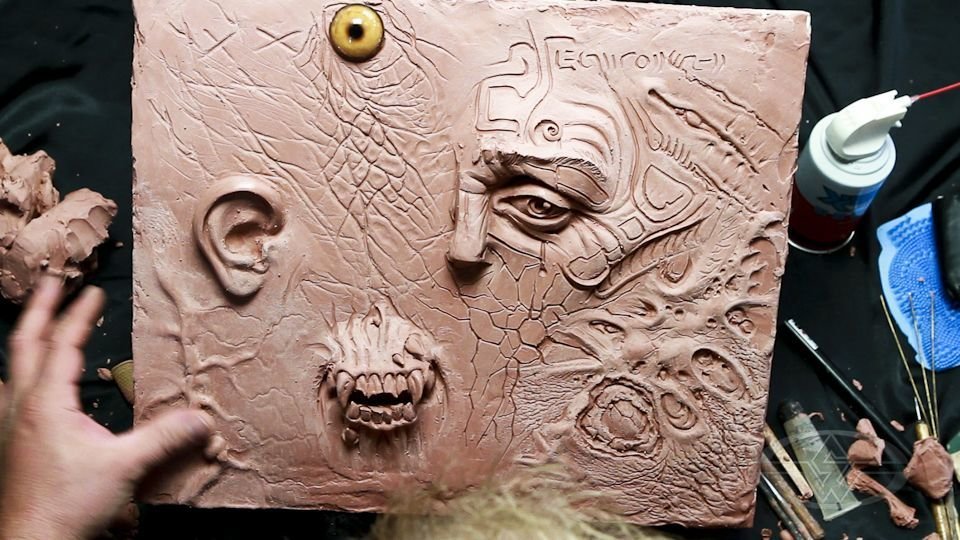
Credit: m.youtube.com
Common Mistakes To Avoid
Working with clay can be rewarding but also tricky. Beginners often make mistakes that hinder their progress. Knowing what to avoid helps you create better textures and designs. Here are some common mistakes to avoid.
Overworking The Clay
One major mistake is overworking the clay. Constantly touching and manipulating the clay can make it dry out. This leads to cracks and makes it harder to shape. Overworked clay loses its flexibility and becomes unmanageable.
To avoid this, work in short bursts. Let the clay rest in between. Keep your hands and tools clean to prevent sticking. Use a spray bottle to keep the clay moist but not wet.
Ignoring Natural Patterns
Another common mistake is ignoring natural patterns. Clay has its own unique texture and grain. Working against these natural patterns can result in an unnatural look. Understanding the clay’s natural lines and patterns helps create realistic textures.
Study the clay’s surface before starting your project. Use tools that enhance the natural lines. Avoid forcing the clay into shapes that it resists. This will make your work look more organic and pleasing.
Finishing Touches
Adding the finishing touches to your clay project is essential. These final steps enhance texture and bring your creation to life.
Smoothing And Blending
Start by smoothing the surface of your clay. Use a damp sponge or your fingers. This removes any rough edges or fingerprints. Blending different clay pieces together seamlessly is crucial. Use a soft brush or a blending tool. This helps in creating a unified look.
Here’s a simple table to guide you:
| Tool | Purpose |
|---|---|
| Damp Sponge | Smoothing rough edges |
| Soft Brush | Blending clay pieces |
| Blending Tool | Creating a unified look |
Adding Final Details
Once the surface is smooth, it’s time to add final details. These details make your project unique. Use a needle tool for fine lines. A toothpick also works well for intricate designs. For texture, use a textured stamp or fabric. Press these gently into the clay.
Here’s a quick checklist for adding final details:
- Use a needle tool for fine lines
- Toothpick for intricate designs
- Textured stamp for unique patterns
- Press fabric gently for texture
Remember, the finishing touches set your project apart. Take your time and enjoy the process.
Caring For Your Sculptures
Once you’ve mastered the art of skin texture in clay, it’s crucial to care for your sculptures properly. Proper care ensures your hard work lasts for years. Below are some essential tips for maintaining your clay sculptures.
Proper Storage
Storing your clay sculptures correctly preserves their beauty and structure. Follow these tips for optimal storage:
- Keep sculptures in a cool, dry place.
- Avoid direct sunlight to prevent fading.
- Use soft cloth covers to protect from dust.
- Store on sturdy shelves to avoid tipping.
- Ensure shelves are lined with foam or soft material.
Repairing Damages
Accidents happen, and sculptures may get damaged. Here’s how to fix minor issues:
- Cracks: Fill with fresh clay and smooth the surface.
- Chips: Use a clay slip to reattach broken pieces.
- Surface Scratches: Sand lightly with fine-grit sandpaper.
- Broken Parts: Apply strong adhesive and let it dry.
Always handle repairs with care to avoid further damage. Use minimal force and appropriate tools for the job.
Conclusion
Mastering skin texture in clay requires practice and patience. With these tips, you’ll create lifelike sculptures. Experiment with different tools and techniques to find what works best for you. Keep refining your skills, and soon your clay sculptures will have realistic, detailed skin textures.
Happy sculpting!


