Considered a timeless art form, pottery is an enduring craft that has been around since ancient times. Whether you’re just beginning your journey into ceramic art or are an experienced potter looking to try something new, decorating with slip is an easy yet breathtaking way to adorn your creations.
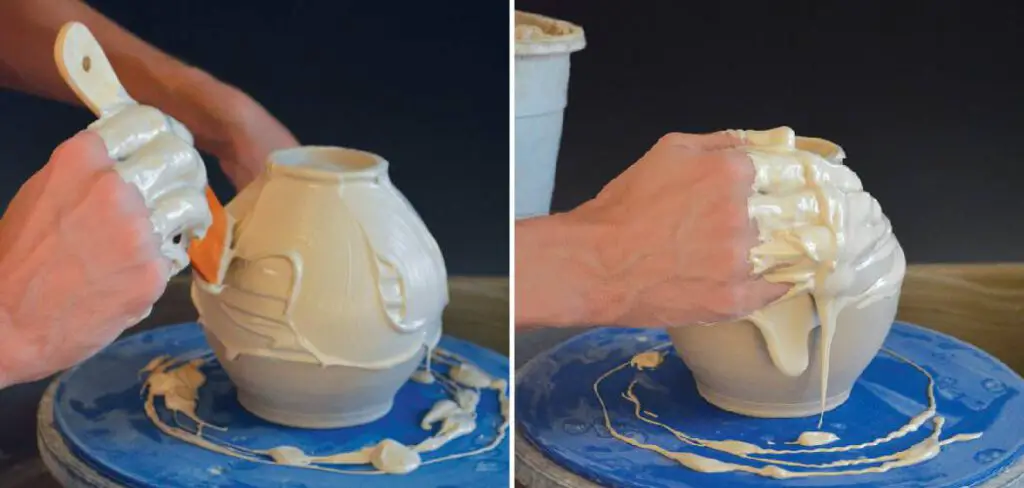
This age-old decoration method involves painting liquid clay of varying consistencies directly onto the surface of fired ceramics – giving even novice artists the materials and tools to create stunning designs! In this blog post, we’ll discuss more about what slip is and how it can be used to add intricate details, and how to decorate with slip so that you can level up your handmade works of art.
Table of Contents
Can You Use a Casting Slip for Decoration?
Yes, you can use the casting slip for decoration. This is a great way to create unique pieces that are perfect for any decorating style. Casting slip is usually made of porcelain clay and colored with glazes, stains, or other decorative elements. It can be used to create bowls, plates, sculpture pieces, vases, and other decorative items.
When using a slip for decoration, it is important to consider the size and shape of the piece you are creating. Smaller pieces may require more layers of a slip or need to be finished with a glaze or protective sealant. Larger pieces can be harder to work with as they can be heavier and may not respond well to molding or intricate detailing.
Another factor to consider when decorating with slip is how much clay is needed. Thicker slips require larger amounts of clay than thinner ones, so it’s important to plan ahead and make sure you have enough material on hand before starting your project.
It is also important to pay attention to drying times and temperatures when decorating with slip. For some pieces, it may be necessary to allow the clay to air dry before making further adjustments. Additionally, firing temperatures for slip-decorated items can vary depending on the type of clay and any glaze or sealant you are using. Make sure you read all instructions carefully to ensure that your finished pieces will look their best.
Once your piece has been created and fired, you can add finishing touches like paint, decals, transfers, or other decorations. Slip-decorated pieces make great gifts or home decor accents and are sure to bring a unique touch to any space! With a little bit of creativity and careful planning, you’ll be able to create beautiful decorative items with casting slips in no time!

10 Methods How to Decorate with Slip
1. Sponging
This technique involves dipping a sponge in a slip or applying it directly onto the pottery using a brush. As you move the sponge across the surface of the piece, you will create interesting patterns, shapes, and textures. To ensure that the slip adheres to the pottery correctly, it is important to make sure that the surface of the pottery is clean and dry before you start. To make sure that your slip is evenly spread, use a small amount of water to help in the application process.
2. Stamping
Using stamps made of rubber, wood, or metal, you can press them into the wet slips to create an interesting pattern on your piece. Be sure to use different-shaped stamps for more creative options! You can even combine stamps with sponges or carving tools to create unique, intricate designs. For a finishing touch, you can also use pigments or glazes to give your stamping an extra pop of color.
3. Splattering
Dip a stiff brush in liquid slip and tap it against the side of your container to splatter it on your piece’s surface. Play around with different sizes and shapes of brushes for different types of splatter designs! To create light drops of slip, use a smaller brush and a lighter touch. For larger designs, use a bigger brush and tap it harder against the side of your container. Experiment with different techniques to see what you like best! After splattering, let your piece dry for about 24 hours before continuing on to the next step.
4. Drawing
Slips can be used like paint to draw detailed patterns or shapes onto pottery pieces. Try using pointed tools such as knitting needles, toothpicks, and bamboo skewers for finer details! To begin, moisten the area to be decorated with a damp sponge. This will help the slip adhere. Then, dip your tool of choice into a container of slip and draw on the piece. Let it dry or if you need a darker color, apply a second layer. If you make any mistakes, you can use a damp sponge to erase them.

5. Marbling
Dip small sponges in two colors of slip and roll them together until they are fully mixed together before pressing them onto your piece’s surface. You’ll achieve beautiful marbled textures that will look unique every time! To help you achieve more control over the finished look of your marbling, use a larger sponge and dip it into two colors separately for a more distinct pattern. You can also double-dip a sponge to get an even more intricate design.
6. Throwing
Before throwing, place pre-mixed slip on the wheel head while spinning, then shape it as desired by manipulating with hands/tools before adding additional layers if needed once thrown shape is achieved — this process results in an even, streak-free finish when fired correctly! Lastly, to add texture or decoration, use tools such as a rib, loop tool, or even just your fingertips on the wet clay.
7. Screen Printing
Create intricate patterns on flat surfaces by using stencils cut from silk screens dipped in liquid clay solutions, which dry quickly, leaving behind a beautiful design imprinted into the clay body itself! Screen printing can be a fun and creative way to decorate with a slip. Make sure that the screens are cleaned thoroughly between uses so as not to contaminate the slip with any foreign object.
8. Hand Painting
Use slips or underglazes as watercolors painting them directly onto greenware (unfired) pieces; special care must be taken so as not to disturb any underlying decorations that may also exist on the surface being painted. However, hand painting adds amazing subtlety & complexity when done properly!

To complete this technique, make sure to fill in any gaps that may arise from the texture of the slip or underglaze. Once finished, apply a layer of clear glaze to protect your painted design and then fire the piece in a kiln.
9. Sgraffito
Decorate with sgraffito by scratching through layers of colored slips applied over bisque ware (previously fired). This method will reveal whatever color was beneath the top layer creating fabulous contrast & visual interest all over the pottery body itself!
To achieve the best results, create a design and draw it with a pencil first. Then use tools such as knives, stylus, or needles to scratch through top layer slips. Once completed, the pottery piece should be fired again to seal in the colors and create a permanent design.
10. Masking
Lastly, mask off certain sections with glue resist prior to applying multiple layers of variously colored slips — once fired, rub off all glue residue uncovering intricate patterns beneath that would have otherwise been impossible without masking off first! You can also use pre-made resist in the form of tape, stickers, or specially formulated wax. Use transfer paper to copy images onto your slip-covered ware.
Things to Consider When Decorating Pottery With Slip:
1. Choose Your Slip:
Start by selecting a slip that is appropriate for your pottery glaze and clay body. Different types of clay and glazes require different types of slips to adhere correctly. It is best to consult with a professional ceramicist or potter to ensure the right slip is chosen for your project.
2. Prepare the Slip:
Once you have chosen a suitable slip, mix it with water until it forms a thick paste-like consistency. It is important to check the viscosity of your slip before applying it, as too much water or not enough can cause the slip to be ineffective.

3. Apply the Slip:
Once you have prepared the slip, you are ready to apply it to your pottery piece. There are several methods for doing this, including brush-on, dipping, and pouring. The method you choose will depend on the size and shape of your pottery piece.
4. Fire Your Piece:
After your piece is decorated with a slip, it needs to be fired in a kiln. Firing the piece will burn off any excess slip and cause the decoration to adhere to the pottery. Different types of slips may require different firing temperatures, so it is important to check with a professional for proper instruction.
Conclusion:
Decorating pottery with slip is a great way to bring a little bit of color and texture to your creations. With a few easy steps, you can make all sorts of designs and effects that you never thought possible. You don’t have to be a professional artist or have years of experience to create beautiful pottery pieces.
Using slip can be an easy and effective way for anyone, from beginners to experienced potters, to decorate their work and add some flair. So why not give it a try? And for further assistance, visit our resource center for guides on How to Decorate Pottery with Slip that will help take your designs to the next level.


