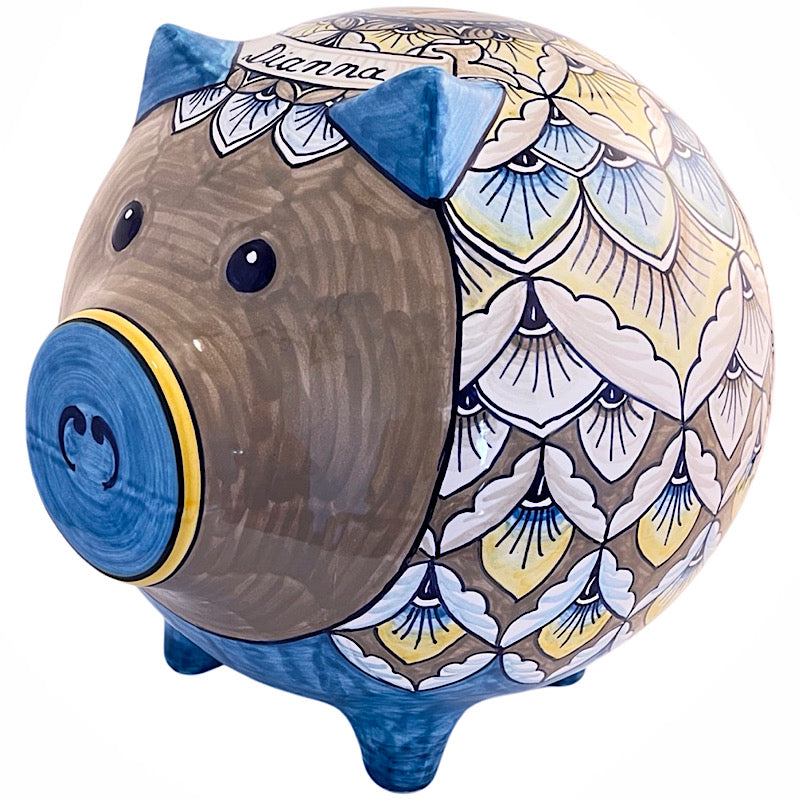
To decorate ceramic piggy banks, use acrylic paints and seal with a clear varnish. Add details with markers or stickers.
Decorating ceramic piggy banks is a fun and creative project. It allows you to personalize a simple item into a unique piece. You can choose from a variety of materials, such as acrylic paints, markers, and stickers, to achieve different looks.
Ensure you have a clear workspace and all necessary supplies before starting. Clean the piggy bank to remove dust and dirt. Planning your design in advance can help achieve a more polished result. This activity is great for both kids and adults, making it an enjoyable family activity or a solo crafting session.
Table of Contents
Choosing The Right Piggy Bank
Decorating a ceramic piggy bank can be a fun activity. The first step is choosing the right piggy bank. This ensures a great starting point for your creative project.
Materials And Types
Different materials offer different feels and durability. Ceramic piggy banks are classic and easy to paint. Plastic piggy banks are durable but may not hold paint well. Metal piggy banks are sturdy but harder to decorate. Choose a material that fits your needs.
There are various types of piggy banks. Traditional ones have a coin slot at the top. Some modern piggy banks can count coins. Choose a type that excites you.
Size And Shape Considerations
Piggy banks come in all sizes and shapes. Smaller piggy banks are easier for kids to handle. Larger piggy banks hold more coins but may take up more space.
The shape of the piggy bank can also vary. Traditional piggy banks are shaped like pigs. Other designs include animals, cars, or even superheroes. Think about the person who will use it. Choose a shape that makes them smile.
Essential Decorating Supplies
Decorating a ceramic piggy bank is a fun activity. It brings out your creativity. To begin, gather your essential decorating supplies. These items will help you craft a unique piggy bank. Below, we discuss the must-have supplies for this project.
Paints And Brushes
Choosing the right paints and brushes is crucial. You want your piggy bank to look vibrant. Acrylic paints work best for ceramics. They are easy to use and dry quickly. Select a variety of colors. This will give you more creative freedom.
Next, consider your brushes. A set of small and medium brushes is ideal. Small brushes help with details. Medium brushes are good for larger areas. Ensure your brushes are clean before you start. This keeps your colors pure and bright.
| Paint Type | Best Use |
|---|---|
| Acrylic Paint | Vibrant colors, quick drying |
| Oil Paint | Rich texture, slow drying |
| Watercolor Paint | Light wash, not recommended for ceramics |
Stencils And Stickers
Stencils and stickers make decorating easy. They provide clean lines and fun designs. Stencils are reusable. You can create patterns or shapes. Stick them to your piggy bank. Paint over them for a neat look.
Stickers add instant charm. They come in many designs. Choose stickers that match your theme. For example, animal stickers for a zoo theme. Make sure the surface is clean before applying stickers. This ensures they stick well.
- Stars and hearts
- Animal shapes
- Alphabet letters
These supplies will make your piggy bank unique. Enjoy the process and let your creativity shine!
Preparing Your Workspace
Decorating a ceramic piggy bank is fun and creative. The first step is to prepare your workspace. A well-organized area ensures your tools are easily accessible and your project goes smoothly.
Setting Up Your Area
Choose a clean, flat surface like a table or desk. Cover the surface with newspaper or a plastic sheet. This protects your workspace from paint and glue. Ensure you have good lighting. A bright area helps you see colors clearly and paint details accurately.
Organizing Your Tools
Gather all your tools before starting. This includes:
- Paints and brushes
- Water cup for cleaning brushes
- Paper towels
- Glue and embellishments (like glitter, beads, stickers)
Arrange your tools within reach. Use small containers or trays to keep items organized. This prevents spills and makes finding tools easier.
Keep a small trash bin nearby. This helps keep your area tidy. A clean workspace boosts creativity and efficiency.
| Tool | Purpose |
|---|---|
| Paints | Add color to the piggy bank |
| Brushes | Apply paint smoothly |
| Glue | Attach embellishments |
| Paper Towels | Clean brushes and spills |
By setting up your area and organizing your tools, you are ready to decorate your ceramic piggy bank with ease.
Basic Painting Techniques
Decorating ceramic piggy banks can be a fun and creative activity. Learning some basic painting techniques can make your piggy bank stand out. This section will cover two simple methods: solid colors and gradient effects.
Solid Colors
Painting your ceramic piggy bank in solid colors is a straightforward technique. You can choose one color or several. Follow these steps:
- Clean the piggy bank with a damp cloth. Let it dry completely.
- Choose a color. Pour a small amount of paint onto a palette.
- Dip a clean brush into the paint. Apply a thin, even coat.
- Let the first coat dry. Apply a second coat if needed.
- Allow the paint to dry completely before handling.
Using solid colors can create a bold and vibrant look. It’s also a great way to cover up any imperfections on the ceramic surface.
Gradient Effects
Creating a gradient effect can add depth and interest to your piggy bank. Follow these steps:
| Step | Description |
|---|---|
| 1 | Choose two or more colors that blend well together. |
| 2 | Clean the piggy bank. Let it dry. |
| 3 | Start with the lightest color. Paint the top or bottom. |
| 4 | Let the first layer dry. Apply the next color. |
| 5 | Blend the edges where the colors meet. Use a clean brush. |
| 6 | Continue blending until you reach the desired effect. |
| 7 | Allow the paint to dry completely. |
Gradient effects can make your piggy bank look more artistic. You can experiment with different colors and blending techniques to achieve unique results.
Adding Patterns And Designs
Decorating ceramic piggy banks can be a fun activity. Adding patterns and designs makes them unique. You can use stencils or freehand drawing. Let’s explore these methods to make your piggy banks stand out.
Using Stencils
Stencils are a great way to create precise patterns. They come in many shapes and sizes. You can buy them or make your own. Here’s how to use stencils for decorating:
- Choose a stencil that matches your design idea.
- Secure the stencil on the piggy bank with tape.
- Apply paint over the stencil using a brush or sponge.
- Remove the stencil carefully to reveal the design.
Using stencils is easy and gives neat results. You can create flowers, stars, or any other patterns.
Freehand Drawing
Freehand drawing lets you be creative. You can draw anything you like. Here are steps to get started:
- Use a pencil to sketch your design lightly on the piggy bank.
- Choose paint colors that match your design.
- Paint over the sketch with fine brushes.
- Let the paint dry completely before adding details.
Freehand drawing gives a personal touch to your piggy bank. You can draw animals, shapes, or even names.
| Method | Tools Needed | Advantages |
|---|---|---|
| Using Stencils | Stencil, Tape, Paint, Brush | Neat, Easy, Many Patterns |
| Freehand Drawing | Pencil, Paint, Fine Brushes | Creative, Personal Touch |

Credit: www.amazon.com
Incorporating Text And Names
Adding text and names to ceramic piggy banks makes them special. Whether for a child or an adult, personalized messages add charm. Let’s explore different ways to incorporate text and names on your ceramic piggy bank.
Lettering Styles
Choosing the right lettering style is important. Different styles can set the tone of your design. Here are some popular options:
- Classic Serif: Great for a traditional look.
- Playful Script: Perfect for kids’ piggy banks.
- Modern Sans-Serif: Ideal for a clean, contemporary feel.
- Handwritten: Adds a personal touch.
Using a mix of styles can also be effective. You can combine a bold font with a script font for emphasis.
Personalization Tips
Personalizing your ceramic piggy bank can make it unique. Here are some tips to get you started:
- Choose a theme: Decide on a theme that matches the recipient’s interests.
- Select the right colors: Use colors that complement your design.
- Practice first: Sketch your design on paper before applying it to the piggy bank.
- Use stencils: Stencils can help achieve clean, professional-looking text.
- Seal your work: Use a clear sealant to protect your design.
Here’s a simple table to help you choose the best materials for personalization:
| Material | Best For |
|---|---|
| Permanent Markers | Quick, simple designs |
| Paint Pens | Vibrant, detailed designs |
| Decals | Professional, polished look |
Use these tips and materials to create a beautiful ceramic piggy bank. Your personalized touch will make it a cherished keepsake.
Embellishments And Accessories
Decorating ceramic piggy banks can be a fun and creative activity. Adding embellishments and accessories can make each piggy bank unique. Let’s dive into some exciting ways to enhance your piggy bank with glitter and decorative elements.
Adding Glitter
Glitter can make your piggy bank sparkle and shine. Here’s how to add glitter:
- Choose your glitter color: Pick a color that matches your theme.
- Apply glue: Use a brush to apply a thin layer of glue.
- Sprinkle glitter: Gently sprinkle glitter over the glued areas.
- Let it dry: Allow the glue to dry completely.
- Seal the glitter: Apply a clear sealant to keep the glitter in place.
Attaching Decorative Elements
Adding decorative elements can make your piggy bank stand out. Consider these options:
- Use fabric or ribbon: Wrap a colorful ribbon around the piggy bank’s neck.
- Attach buttons or beads: Glue buttons or beads for a textured look.
- Stick on gems: Use adhesive gems to add sparkle and color.
- Add stickers: Choose fun stickers that match your theme.
- Paint accents: Use acrylic paint to add details and patterns.
| Decoration Type | Materials Needed |
|---|---|
| Glitter | Glitter, Glue, Brush, Sealant |
| Ribbon | Ribbon, Scissors, Glue |
| Buttons | Buttons, Glue |
| Gems | Adhesive Gems |
| Stickers | Stickers |

Credit: biordi.com
Finishing Touches
After spending time painting and decorating your ceramic piggy bank, the final touches will make it stand out. This part of the process involves sealing your artwork and doing final inspections.
Sealing Your Work
Sealing your ceramic piggy bank protects your design. Choose a clear sealant suitable for ceramics. Spray or brush the sealant evenly. Ensure every part is covered, including small details. This step helps preserve the colors and designs.
Allow the sealant to dry completely. Check the product instructions for drying times. Typically, it may take a few hours. Sealing also adds a shiny finish to your piggy bank, making it look polished.
Final Inspections
Before you finish, do a final check of your piggy bank. Look for any missed spots or uneven paint. Fix any imperfections using a small brush. Make sure the sealant has dried properly.
Check the piggy bank’s functionality. Ensure the coin slot is clear and the bottom stopper fits well. This step ensures your piggy bank is both beautiful and functional.
Display your decorated piggy bank proudly. It will be a great addition to your room or a perfect gift.

Credit: sunshineandsippycups.com
Conclusion
Decorating ceramic piggy banks can be a fun and creative project. Follow these steps to personalize your piggy bank. Enjoy the process and let your imagination run wild. Whether for yourself or as a gift, a decorated piggy bank adds charm and uniqueness.
Start decorating and unleash your creativity today!


