How to Load a Kiln for an Even Firing
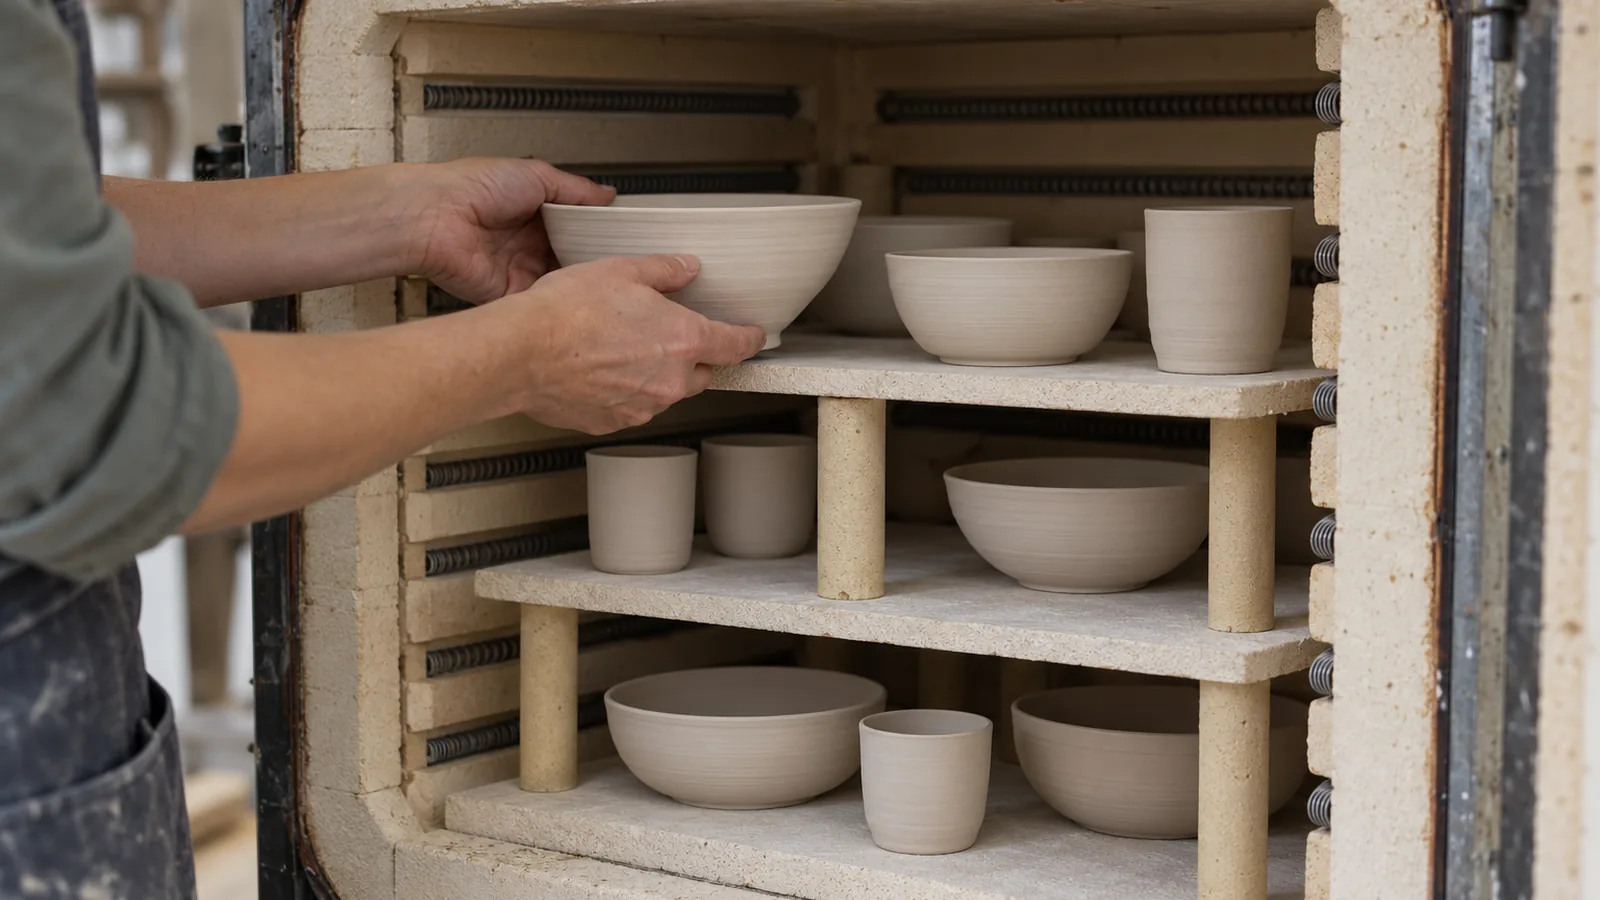
To learn how to load a kiln, place dry, compatible ware on stable shelves supported by at least 3 posts per shelf. Leave room for heat to circulate, and keep every piece and shelf clear of the elements; the required clearance varies by kiln, so use its specific spacing guidance.
Quick answer
How do I load a kiln?
Load dry ware on stable shelves supported by at least 3 posts per shelf, leaving space for heat to circulate and keeping ware and furniture clear of the elements. Use the clearances for your kiln and firing, since spacing differs by model and ware.
- Prepare: Confirm the firing type and that the ware is dry; before loading or unloading, switch off and disconnect the kiln, then wait until it cools to 135°F (57°C) or less.
- Build the base: Set support posts on the kiln floor, then place the bottom shelf on them, not directly on the floor.
- Add shelves: Use at least 3 posts per shelf, check each shelf for stability, and add or reposition posts if it rocks or shifts.
- Arrange ware: Put heavy pieces low; leave space between glazed pieces, and allow more room for clay bodies that expand during firing.
- Check clearances: Keep ware, shelves, and posts away from elements, walls, and sensors; make sure the lid or door closes without touching the load.
- Verify controls: Keep the temperature sensor or Kiln Sitter unobstructed; for an Evenheat kiln with a Kiln Sitter, place the proper cone in its tube assembly before loading.
Load the kiln step by step
Confirm the firing type and make sure the ware is dry, then build a stable load from the kiln floor upward. Clearance depends on the kiln and the ware: use the model-specific values below where they apply. Measurements from one kiln don’t apply to every kiln.
| Setup | Clearance | Source |
|---|---|---|
| Glazed pieces | ¼ in. between pieces | hotkilns.com |
| Shelves, Paragon guidance | At least 2½ in. apart | corp.paragonweb.com |
| Ware, Paragon guidance | At least 1 in. from heating elements | corp.paragonweb.com |
| Ware, Skutt guidance | 2 in. from lid; 1 in. from walls and bottom; 2 in. from thermocouple | skutt.com |
The different lid clearances show why you need to use the guidance for your kiln rather than combine measurements from different brands. Bisque pieces may touch under L&L’s guidance, but glazed pieces need room between them.
Confirm the kiln and ware are ready. For an Evenheat kiln with a Kiln Sitter, place the proper cone in the tube assembly before loading. Before loading or unloading, switch the kiln off, disconnect its power, and wait until it cools to 135°F (57°C) or less. Confirm the firing type and load only dry ware.
Set the kiln furniture. Put support posts on the kiln floor, then place the bottom shelf on the posts, not directly on the floor. Add posts under heavy loads, and keep shelves, posts, and ware clear of walls and sensors.
Arrange the pieces. Place heavy pieces low, leave clearance between glazed pieces, and arrange shelves with room for heat to circulate. Follow the spacing guidance for your kiln and firing; the figures in the table apply to the named guidance, not every kiln.
Check stability and element clearance. After setting each shelf, check that it’s stable; reposition or add posts if needed. Keep ware away from heating elements, using your kiln’s specified clearance.
Verify the load before firing. Make sure the lid or door closes without touching ware or kiln furniture. Check that the Kiln Sitter or thermocouple hasn’t shifted and that ware and furniture don’t block sensors.
How should you space pieces and shelves?
Space pieces and shelves according to your kiln’s clearance rules, leaving open paths for heat to circulate and keeping ware away from elements, walls, and sensors. There’s no single spacing figure for every kiln: the recommendations vary by kiln and setup.
Set the bottom shelf on support posts rather than directly on the kiln floor. Soul Ceramics recommends 3 to 4 floor posts, ½–1 in. tall, to support the shelf and allow air and heat circulation. For additional levels, it recommends posts about ½–1 in.
taller than the ware on the shelf below. L&L recommends 3 posts per shelf as its usual arrangement, positioned about 1 in. in from the shelf edge, with post columns aligned vertically. These are setup recommendations, not a universal layout; choose a stable arrangement that suits your kiln and load.
Leave enough space between shelves for the work and kiln’s heating elements. Paragon recommends at least 2½ in. between shelves, with at least one element row between them. Treat that as Paragon’s guidance, rather than a standard for every kiln, and use the applicable kiln-specific clearance when it differs.
Keep shelves and ware clear of the kiln’s walls and temperature sensors. Soul Ceramics advises keeping shelves, posts, and ware at least 1 in. from the walls and sensor or Kiln Sitter tube assembly. Skutt specifies 2 in.
from the lid, 1 in. from the walls and bottom, and 2 in. from the thermocouple. Those clearances apply to Skutt’s guidance; don’t transfer them to another kiln without checking that model’s requirements.
Arrange pieces so they don’t crowd one another or block the space needed for circulation. Leave extra room around clay bodies that expand significantly during firing, as L&L advises. Keep heavier pieces low, and add support under heavy loads so shelves and posts remain stable.
Choose kiln furniture for the load
Use shelves and posts to build stable levels that support the work and leave room for air and heat to circulate; the right setup for how to load a kiln depends on the kiln and the pieces. Start with the kiln floor: set support posts on the floor, then place the bottom shelf on the posts rather than directly on the floor.
For the bottom shelf, use 3 or 4 posts that are ½–1 in. tall. For each additional shelf, use at least 3 posts, with 4 preferred; 3 posts are also a usual arrangement. Choose post positions that keep the shelf stable and support the load, adding support under heavy loads.
Set the posts for each upper level about ½–1 in. This creates room for the next shelf without letting it rest on the work. Keep heavy pieces on lower shelves, and arrange the shelves and posts so the loaded stack stays stable.
Keep the furniture clear of kiln walls and temperature sensors or the Kiln Sitter tube assembly; one setup guide recommends at least 1 in. of clearance from those components. Clearance needs differ by kiln: use the requirement for your model rather than treating one post height or shelf arrangement as universal.
What should you check before firing?
After loading, check that every shelf and piece is stable, nothing can touch the kiln elements, and the lid or door closes without contact. A clear, stable load should also leave the thermocouple or Kiln Sitter unobstructed and undisturbed.
Keep away from heating elements and conductive parts inside the kiln, which can cause electric shock.
Check each shelf after placing it: if it rocks or shifts, reposition it or add posts until it sits securely. Confirm that the posts support the shelf and that heavy pieces have adequate support underneath. Heavy pieces belong low in the load, with support arranged to keep the stack stable.
Check clearances against your kiln’s requirements, since the figures differ by model and guidance. Paragon recommends keeping ware at least 1 in. from heating elements. Skutt specifies 2 in.
from the lid, 1 in. from the thermocouple. Soul Ceramics recommends at least 1 in. between ware and the lid or door, while Skutt specifies 2 in.
from the lid. Use your kiln’s stated clearance when its requirements differ from general guidance.
Before closing the kiln, look across the load and check that ware, shelves, or posts won’t touch the lid or door. Verify that nothing blocks the temperature sensor or Kiln Sitter, and that neither has shifted during loading. For an Evenheat kiln with a Kiln Sitter, confirm the proper cone is in the tube assembly before loading. If you’ve already loaded it, check that the cone is in place.
Frequently Asked Questions
Can you stack pieces in a kiln?
Yes, you can stack pieces when the work and firing allow it, but keep each piece stable and leave room for heat to circulate. Bisque ware may touch under L&L’s guidance; glazed pieces need at least ¼ in. between them, and clay bodies that expand during firing need more room. Don’t let stacked work touch shelves, kiln elements, or sensors.
How do you keep kiln shelves level?
Set each shelf on stable support posts, then check for rocking or shifting before adding more work. Use at least 3 posts per shelf, with 4 preferred in one setup guide; align post columns vertically and add support under heavy loads. Reposition the posts or add support if a shelf isn’t stable.
Where should you place witness cones in a kiln?
Place witness cones where you can see them through a peephole and where they won’t touch ware as they bend. Keep them clear of kiln furniture and other pieces so nothing blocks their movement during firing.
Should kiln peepholes be open during firing?
Keep peepholes in the position specified for your firing and kiln, since the sources don’t give one setting for every setup. Before firing, make sure the peephole area and any temperature sensor remain unobstructed; don’t let ware or kiln furniture interfere with the sensor.
Can you mix bisque and glazed ware in one kiln load?
Yes, if the ware is dry, the pieces can share the firing, and the firing is suitable for both the clay and glaze. Keep glazed pieces at least ¼ in.
Conclusion
If you’re firing glazed work or using a kiln with tight clearances, arrange the load around that kiln’s specific spacing guidance. For a simple, stable load, place heavier pieces low, support each shelf securely, and leave clear paths around the ware and sensors.
Before firing, check the loaded shelves for movement, confirm nothing can touch the elements or lid, and make sure the sensor or Kiln Sitter is unobstructed. If any part shifts or crowds the kiln, adjust the load before you start the firing.
Sources
- Loading your kiln (soulceramics.com)
- hotkilns.com (hotkilns.com)
- corp.paragonweb.com (corp.paragonweb.com)
- skutt.com (skutt.com)