Preserving the vibrancy and longevity of your acrylic-painted clay creations requires a thoughtful approach to sealing. Knowing how to seal acrylic paint on clay is a crucial step in the pottery and sculpting process, ensuring that your artwork stands the test of time. In this comprehensive guide, we will explore the various techniques and sealants necessary to protect and enhance your acrylic-painted clay pieces. From selecting the right sealant for your project to mastering the application process, we’ll provide step-by-step insights into achieving a professional and durable finish.

Whether you’re a seasoned ceramic artist or venturing into the world of clay for the first time, understanding the nuances of sealing acrylic paint on clay will elevate your creations, offering a protective layer that not only enhances the colors but also safeguards your artistic efforts for years to come. Join us on this journey as we uncover the secrets to sealing acrylic paint on clay and unlocking the full potential of your artistic endeavors.
Table of Contents
Importance of Sealing Acrylic Paint on Clay for Protection and Longevity
When it comes to creating clay art, sealing acrylic paint is an essential step. Not only does it enhance the appearance of your work, but it also plays a crucial role in protecting and preserving the artwork for years to come.
Acrylic paint is a popular choice among artists due to its versatility and fast-drying nature. However, unlike other types of paints, acrylics can easily chip or flake off, especially on porous surfaces like clay. This is where sealing comes in.
Sealing acrylic paint on clay creates a barrier between the paint and the environment, preventing damage from moisture, dust, and UV rays. Without proper sealing, the colors may fade or become dull over time, compromising the overall look of your artwork.
Moreover, sealing also helps to make the paint more resistant to physical damage. This is important as clay art can be fragile and easily break if not handled carefully. Sealing adds a protective layer that makes the paint less prone to scratches, cracks, or chips.
Apart from protection, sealing also plays a crucial role in longevity. Acrylic paints are made of synthetic polymers that can degrade over time due to exposure to air and light. Sealing protects the paint from these factors, ensuring that your artwork stays vibrant and intact for years.
In addition, sealing also makes it easier to clean and maintain your clay art. It creates a smooth surface that can be wiped with a damp cloth without damaging the paint or the underlying clay.

10 Methods How to Seal Acrylic Paint on Clay
1. Apply a Clear Sealant
One of the most effective ways to seal acrylic paint on clay is to apply a clear sealant. There are several types of sealants available, including matte, glossy, and high-gloss finishes. The type of sealant you choose will depend on the look you are trying to achieve. When applying the sealant, make sure to follow the manufacturer’s instructions for best results.
2. Bake in an Oven
Another method of sealing acrylic paint on clay is to bake it in an oven. This method works best for small pieces and requires that you preheat your oven before baking the piece. Make sure to place the piece on a heat-resistant surface, such as parchment paper, before putting it in the oven. Once it has been baked, allow it to cool completely before handling or painting over it.
3. Use Acrylic Varnish
Using an acrylic varnish is another great way to seal acrylic paint on clay. Acrylic varnishes come in both matte and glossy finishes and can be applied with a brush or sprayed on with an aerosol canister. When applying the varnish, make sure that all areas are covered evenly and that no excess is left behind, as this could affect the final result of your project.
4. Use Polyurethane
Polyurethane is another great option for sealing acrylic paint on clay, as it provides a durable finish that won’t easily chip or scratch off over time. It also helps protect against UV rays and other environmental factors, which can cause fading or discoloration of your painted piece over time. When applying polyurethane, make sure to use even strokes and avoid leaving any excess behind, as this could cause bubbling or cracking of your finished product when dry.
5. Use Mod Podge
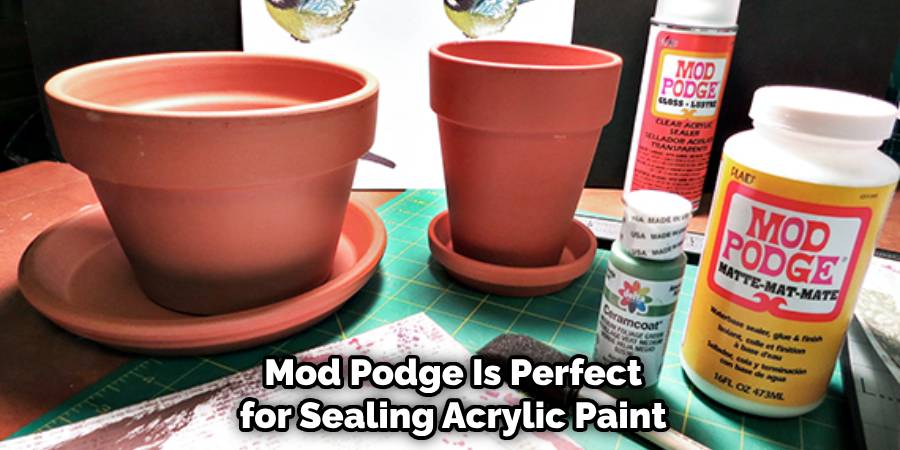
Mod Podge is an all-in-one glue, sealer, and finish which makes it perfect for sealing acrylic paint on clay projects! This product comes in a variety of finishes, including gloss, satin, and matte, so you can choose one that best suits your project needs! To apply Mod Podge, simply brush it onto your project in thin coats until all areas have been covered evenly, then allow it to dry completely before handling or painting over it again!
6. Try Resin Coating
Resin coating is another great way to seal acrylic paint on clay projects! This method involves mixing together two parts of epoxy resin with hardener, then brushing onto your project until all areas have been coated evenly! Resin coating provides a durable finish that won’t easily chip or scratch off over time while also protecting against UV rays and other environmental factors that can cause fading or discoloration of your painted piece over time!
7. Spray with Lacquer
Spraying lacquer is another popular method used for sealing acrylic paint on clay projects! Lacquer comes in both matte and glossy finishes, so you can choose one that best suits your project needs! To apply lacquer, simply spray it onto your project from 6-8 inches away until all areas have been covered evenly, then allow it to dry completely before handling or painting again! Be sure not to overspray, as this could cause bubbling or cracking when dry!
8. Try Enamels
Enamels are paints made from pigments mixed with resins which give them their durability, making them great for sealing acrylic paint onto clay projects! Enamels come in both oil-based (solvent) and water-based (acrylic) varieties, so you can choose one that best suits your project needs! To apply enamels, simply brush them onto your project until all areas have been covered evenly, then allow them to dry completely before handling again!
9. Use Waxes
Waxes are also great options for sealing acrylic paints onto clay projects as they provide a protective layer that helps keep colors vibrant while also providing some resistance against scratches & scuffs! Waxes come in both paste & liquid forms, so you can choose one that best suits your project needs & budget constraints, too! To apply waxes, simply brush them onto your project until all areas have been covered evenly, then allow them to dry completely before handling them again – buffing after drying will help enhance the shine & luster, too if desired!
10. Try Polymer Clay Varnishes

Polymer Clay Varnishes are specially formulated products designed specifically for use with polymer clays such as FIMO & Sculpey – these products provide excellent protection against scratches & scuffs while also helping keep colors vibrant & true – plus they’re easy to apply too! Simply brush them onto your polymer clay project until all areas have been evenly coated, then allow them to dry completely before handling again!
Things to Consider When Sealing Acrylic Paint on Clay
Acrylic paint is a popular medium among artists and crafters due to its versatility and vibrant colors. When used on clay, it can create beautiful and long-lasting designs. However, sealing acrylic paint on clay is important to protect the artwork from damage and ensure its longevity.
Here are some things you should consider when sealing acrylic paint on clay:
Choosing the Right Sealer
There are various types of sealers available in the market, such as brush-on sealers, spray sealers, and gloss varnishes. It is important to choose the right type of sealer for your project based on factors like the size and shape of your clay piece, personal preference, and desired finish.
For smaller or intricate clay pieces, a brush-on sealer may be more suitable as it allows for more precision and control. Spray sealers are great for larger or irregularly shaped pieces as they provide even coverage without the risk of brush marks.
Testing on a Small Area
Before sealing your entire clay piece, it is important to test the sealer on a small, inconspicuous area first. This will help you determine how many layers of sealer are needed and if any discoloration or reactions occur between the paint and sealer.
Properly Preparing the Clay Surface
To ensure the sealer adheres to the clay surface properly, it is important to prepare the surface beforehand. This includes cleaning off any dust or debris, and smoothing out any rough areas. If necessary, you can also lightly sand down the surface for better adhesion.
Applying Thin Layers
When sealing acrylic paint on clay, it is best to apply thin layers of sealer rather than one thick layer. This allows for better control and helps prevent any potential cracking or bubbling. It is also important to let each layer dry completely before applying the next.

Protecting the Artwork
Once your acrylic paint on clay has been sealed, it is important to continue protecting it by avoiding direct sunlight, extreme temperatures, and moisture. These factors can cause the sealer to break down and damage the artwork.
Conclusion
To really make sure you seal your acrylic paint on clay and keep it looking beautiful, we recommend lightly coating the project with a spray varnish or gloss. This will give you the extra protection needed when displaying or using your clay creations. Not only that, but it can bring an extra shine to any piece! Sealing in this manner will help extend the life of your art – so take time to show your finished pieces some love and care.
Now that you know how to seal acrylic paint on clay, why not give it a try? Select a plaster mold, mix colors of paint, and don’t forget the finish! Setting aside just a few extra minutes for sealing will stand between you and potential disaster – so start now and create something amazing.


