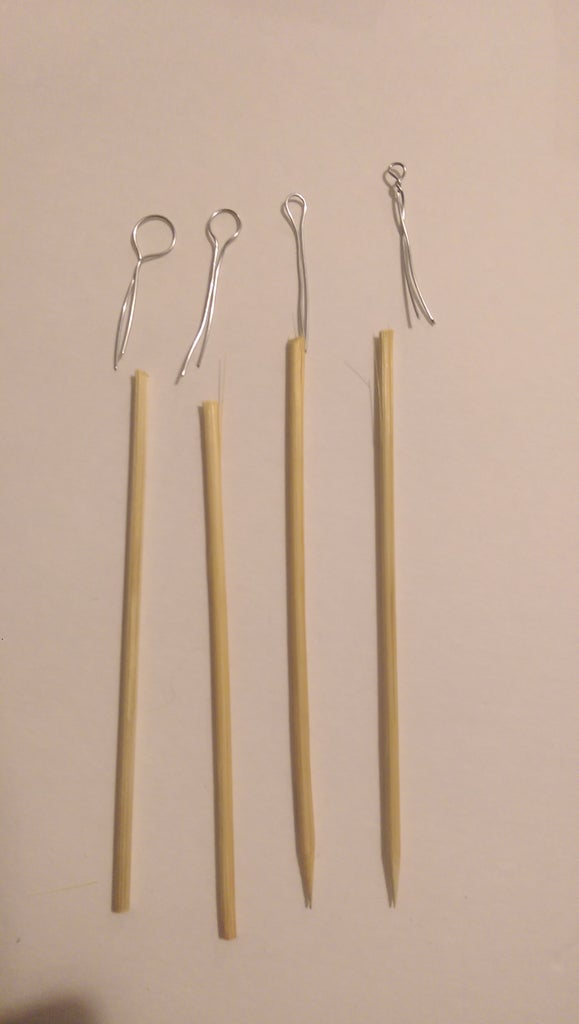
To make clay carving tools, use materials like wood, wire, and metal. Shape and sharpen the tools for precise carving.
Creating your own clay carving tools can save money and enhance your artistic experience. Basic materials such as wood, wire, and metal are easy to find and inexpensive. By customizing the shape and size, you can create tools that perfectly suit your carving style.
This personalized approach not only improves your craftsmanship but also makes your clay projects more enjoyable. Plus, the process of making your own tools can be a rewarding and creative endeavor in itself. Whether you’re a beginner or an experienced artist, crafting your own clay carving tools offers numerous benefits and adds a personal touch to your artwork.
Table of Contents
Introduction To Clay Carving Tools
Clay carving is a fun and creative activity. It allows you to shape clay into beautiful designs. To start, you need the right tools. Making your own tools can save money and is very rewarding.
Importance Of Quality Tools
Good tools make carving easier. They help you create clean and precise lines. Poor tools can break or not work well. Quality tools last longer and give better results.
Basic Tool Types
There are several basic types of clay carving tools you need. Each tool has a specific use. Here are some important ones:
| Tool Type | Use |
|---|---|
| Loop Tools | Remove clay and carve details. |
| Ribbon Tools | Fine carving and shaping. |
| Needle Tools | Score and create fine lines. |
| Wire Cutters | Cut large pieces of clay. |
Start with these basic tools. You can make them at home with simple materials.
- Wood for handles
- Metal for loops and ribbons
- Wire for cutting
Use strong glue to attach metal parts to wooden handles. Sand the wood for a smooth finish. This makes the tools comfortable to hold.

Credit: www.instructables.com
Materials Needed
Creating your own clay carving tools can be a fun and rewarding project. This section will cover the materials needed to get started, ensuring you have everything at hand.
Essential Materials
You’ll need the following essential materials to make basic clay carving tools:
- Wooden Dowels: These form the handles of your tools.
- Metal Rods: For carving and scraping parts of the tools.
- Epoxy Glue: To secure the metal parts to the wooden handles.
- Sandpaper: To smooth out the wooden handles.
- Wire Cutters: For cutting metal rods and wires.
- Files: To shape and smooth the metal tips.
Optional Enhancements
For a more professional finish, consider these optional enhancements:
- Rubber Grips: These make the handles more comfortable.
- Paint: To add a personal touch to your tools.
- Varnish: To protect the wooden handles.
- Foam: For added grip and comfort.
- Extra Fine Files: For detailed and delicate work.
| Material | Purpose |
|---|---|
| Wooden Dowels | Handles for tools |
| Metal Rods | Carving and scraping parts |
| Epoxy Glue | Securing metal to wood |
| Sandpaper | Smoothing handles |
| Wire Cutters | Cutting metal |
| Files | Shaping metal tips |
| Rubber Grips | Comfortable handles |
| Paint | Personal touch |
| Varnish | Protecting wood |
| Foam | Added grip |
| Extra Fine Files | Detailed work |
Safety Precautions
Ensuring your safety while making clay carving tools is crucial. Follow these safety precautions to protect yourself and create a safe workspace.
Personal Protective Equipment
Using Personal Protective Equipment (PPE) can prevent injuries.
- Safety Glasses: Protect your eyes from flying debris.
- Gloves: Shield your hands from sharp tools.
- Dust Mask: Prevent inhaling harmful dust particles.
- Apron: Keep your clothes clean and protect your skin.
Safe Working Environment
Maintaining a safe working environment is essential for your safety.
- Well-Lit Area: Ensure good lighting to see your work clearly.
- Ventilation: Work in a ventilated area to avoid inhaling dust.
- Tool Organization: Keep tools organized to avoid accidents.
- Clear Workspace: Remove clutter to prevent tripping hazards.
| Safety Measure | Purpose |
|---|---|
| Safety Glasses | Eye Protection |
| Gloves | Hand Protection |
| Dust Mask | Breathing Protection |
| Apron | Body Protection |
Follow these guidelines to stay safe while making clay carving tools. Your safety is the most important thing.

Credit: www.pinterest.ca
Preparing Your Workspace
Creating clay carving tools requires a well-prepared workspace. A good setup helps you work efficiently and safely. Follow these steps to get your space ready for crafting.
Organizing Tools And Materials
First, gather all your tools and materials. You will need:
- Clay
- Carving knives
- Wire cutters
- Smoothing tools
- Sandpaper
Place each item in a designated spot. Use containers to keep things tidy. A clean workspace helps you find things quickly.
Setting Up Your Work Area
Next, set up your work area. Find a flat, sturdy table. Cover it with a protective cloth or plastic sheet. This keeps your table clean and safe from scratches.
Ensure you have good lighting. Use a desk lamp if needed. Proper lighting helps you see details better.
Keep a small bucket of water nearby. This helps in smoothing and cleaning tools. Make sure you have paper towels for quick cleanups.
Finally, ensure you have a comfortable chair. You will spend hours crafting, so comfort is key.
| Item | Purpose |
|---|---|
| Clay | Material for carving |
| Carving knives | Shaping the clay |
| Wire cutters | Cutting clay pieces |
| Smoothing tools | Smoothing the surface |
| Sandpaper | Finishing touches |
By organizing your tools and setting up your work area, you create a perfect environment for crafting. A well-prepared space boosts your creativity and efficiency.
Creating Basic Carving Tools
Clay carving is a fun and creative activity. Making your own tools adds a personal touch. You can craft basic tools with simple materials at home. This guide will show you how to make two essential tools.
Making A Wire Loop Tool
The wire loop tool is great for shaping and detailing clay. You can make it with a few easy steps.
- Materials Needed:
- Wire (sturdy but flexible)
- Wooden dowel or old pen
- Super glue
- Wire cutters
- Sandpaper
Step-by-Step Instructions:
- Cut a piece of wire about 6 inches long.
- Bend the wire into a loop shape.
- Twist the ends of the wire together tightly.
- Sand the wooden dowel to smooth out rough edges.
- Wrap the twisted wire ends around one end of the dowel.
- Secure the wire with super glue.
- Let the glue dry completely before use.
Crafting A Needle Tool
The needle tool is perfect for fine details and textures. You can make it easily with a few items.
- Materials Needed:
- Sewing needle
- Wine cork or wooden handle
- Super glue
- Sandpaper
Step-by-Step Instructions:
- Sand the cork or handle to smooth any roughness.
- Insert the sewing needle into one end of the cork.
- Push the needle in halfway for stability.
- Apply super glue around the needle entry point.
- Let the glue dry completely before use.
Advanced Tool Making
Delving into advanced tool making opens up new possibilities for your clay carving journey. Creating your own tools allows for personalized and precise designs. Let’s explore how to make two essential advanced clay carving tools.
Constructing A Ribbon Tool
The ribbon tool is excellent for intricate and detailed work. To create a ribbon tool, gather the following materials:
- Thin metal strips
- Wooden dowel
- Epoxy glue
- Fine-grit sandpaper
Follow these steps:
- Cut a thin metal strip into a ribbon shape.
- Sand the edges smooth.
- Drill a small hole in the wooden dowel.
- Insert the metal strip into the hole.
- Secure it with epoxy glue.
- Let the glue dry completely.
Your custom ribbon tool is now ready for use!
Designing Texturing Tools
Creating texturing tools adds unique patterns to your clay work. You need these materials:
- Metal rods
- Wooden handles
- Epoxy glue
- Needle files
- Fine-grit sandpaper
To design your texturing tool, follow these steps:
- Cut the metal rod to your desired length.
- Shape the end with needle files.
- Sand smooth with fine-grit sandpaper.
- Drill a hole in the wooden handle.
- Insert and glue the metal rod into the handle.
- Allow the glue to dry fully.
Experiment with different patterns and shapes to create various textures.
With these advanced tools, your clay carving will reach new heights.
Customizing Your Tools
Customizing your clay carving tools can improve your crafting experience. By personalizing your tools, you can make them more comfortable and efficient. This section will guide you on how to add comfort grips and personalize tool shapes.
Adding Comfort Grips
Comfort grips can make your tools easier to hold. They reduce hand strain during long carving sessions. Here are some easy ways to add comfort grips:
- Rubber Sleeves: Slide rubber sleeves over the handles. These offer a soft and non-slip grip.
- Tape Wraps: Use sports or grip tape to wrap the handles. This provides a cushioned feel and better control.
- Foam Tubing: Cut foam tubing to fit the handle size. This is ideal for a soft and thick grip.
Choose the method that works best for you. Experiment to find the most comfortable grip.
Personalizing Tool Shapes
Personalizing tool shapes can enhance your carving precision. You can reshape existing tools or create new ones. Follow these steps to personalize your tool shapes:
- Heat the Tool: Use a heat gun to warm the metal part. This makes it easier to bend.
- Shape the Tool: Use pliers to bend the tool into your desired shape. Be careful not to overheat the metal.
- Cool the Tool: Dip the reshaped tool in cold water. This helps it retain the new shape.
- Test the Tool: Try using the new shape on a piece of clay. Adjust the shape if needed.
Creating custom shapes can make your carving more precise and enjoyable. Use different shapes for different carving techniques.

Credit: m.youtube.com
Maintaining And Storing Tools
Proper maintenance and storage of clay carving tools ensure their longevity. Clean tools work better and last longer. Storing them correctly keeps them in top shape.
Cleaning Tips
Regular cleaning is crucial for clay carving tools. Follow these simple steps:
- Rinse tools with warm water.
- Use a soft brush to remove clay residue.
- Dry tools with a clean cloth.
- Apply a light coat of oil to metal parts.
For stubborn clay, use a mild detergent. Avoid harsh chemicals. They can damage tools.
Proper Storage Solutions
Storing tools correctly prevents damage and maintains their condition. Consider these solutions:
| Storage Method | Description |
|---|---|
| Toolbox | A sturdy toolbox keeps tools organized and protected. |
| Hanging Rack | A hanging rack saves space and keeps tools within reach. |
| Drawer Inserts | Custom drawer inserts prevent tools from rolling around. |
Always store tools in a dry place. Moisture can cause rust and damage.
By following these tips, your clay carving tools will remain in excellent condition. Happy carving!
Tips For Effective Clay Carving
Carving clay can be a rewarding and creative hobby. To achieve the best results, it’s essential to know some effective tips. These tips will help you carve clay with precision and ease.
Choosing The Right Tool
Using the correct tool is crucial for clay carving. Each tool has a specific purpose. Here are some tips on choosing the right tool:
- Loop Tools: Great for removing clay and creating smooth surfaces.
- Ribbon Tools: Perfect for detailed carving and fine lines.
- Needle Tools: Ideal for scoring and adding intricate details.
- Wire Cutters: Useful for slicing large pieces of clay.
Techniques For Different Effects
Different techniques can produce various effects in clay carving. Understanding these techniques will enhance your work:
- Incising: Cut into the clay surface to create sharp lines.
- Scoring: Scratch the clay to attach other pieces securely.
- Burnishing: Rub the clay with a smooth tool for a glossy finish.
- Carving: Remove small amounts of clay to create depth and texture.
By using these tips and techniques, you can master clay carving. Your projects will look professional and detailed.
Conclusion And Final Thoughts
Congratulations! You’ve learned how to make your own clay carving tools. This journey might have seemed daunting at first. But with practice, it becomes easy. These custom tools can help you create unique art. Let’s wrap up by summarizing the steps and giving some encouragement for beginners.
Summary Of Steps
Here’s a quick summary of the steps:
- Gather essential materials like wooden dowels and metal strips.
- Cut and shape the metal strips to form various tool tips.
- Attach the metal tips to the wooden dowels using epoxy glue.
- Allow the glue to dry completely before using the tools.
- Sand the wooden handles for a smooth grip.
- Optionally, decorate or label your tools for easy identification.
Encouragement For Beginners
Starting as a beginner can feel challenging. But everyone starts somewhere. Remember, practice is key. Each attempt will improve your skills.
Don’t worry about mistakes. They are part of learning. Use each mistake as an opportunity to grow. Soon, you’ll create amazing clay art with your custom tools.
Stay patient and keep experimenting. Every artist started as a beginner. With dedication, you’ll see progress. Happy carving!
Conclusion
Crafting your own clay carving tools is a rewarding and cost-effective endeavor. With the right materials and techniques, you can create customized tools tailored to your specific needs. Enjoy the process and let your creativity shine through in your clay projects.
Happy carving!


