Crafting a lighthouse from clay pots is a delightful and imaginative project that adds a touch of maritime charm to your garden or home decor. Whether you’re a seasoned DIY enthusiast or just looking for a fun and creative activity, this endeavor offers a unique opportunity to transform ordinary clay pots into a whimsical coastal beacon. In this blog post, we’ll walk you through the steps on how to make a lighthouse from clay pots so that you can get back to using it in no time!
The process involves a combination of artistic flair and practical construction, resulting in a decorative piece that not only serves as a charming ornament but can also provide functional lighting when desired. In this article, we will take you through the step-by-step process of creating your very own clay pot lighthouse, sharing expert tips, design ideas, and inspiration along the way.
Table of Contents
Materials Required for Making a Clay Pot Lighthouse
To make a clay pot lighthouse, you will need the following materials:
Clay pots: You will need at least three clay pots of different sizes. The sizes can vary depending on the desired height and shape of your lighthouse.
- Paint: Acrylic paint is recommended for painting the clay pots. Choose colors that match your desired lighthouse theme.
- Paintbrushes: Different sizes of paintbrushes will be needed for painting the clay pots and adding details.
- Waterproof sealant: To protect the paint from weather damage, apply a waterproof sealant after painting.
- Light source: You can choose to use a solar-powered light or a battery-operated LED light to illuminate your lighthouse.
- Glue: A strong adhesive or epoxy glue will be needed to secure the clay pots together.
- Decorative items: Optional decorative items such as seashells, rope, or miniature figurines can be used to enhance the lighthouse’s appearance.
You can find these materials at your local craft store or online retailers that specialize in pottery and craft supplies.

Step-by-Step Guide on How to Make a Lighthouse from Clay Pots
Step 1: Choose Your Design
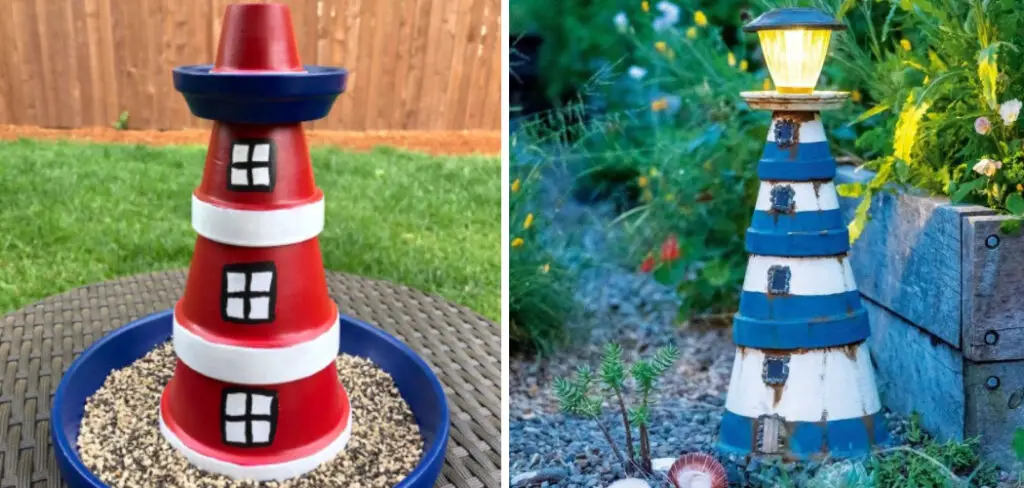
Decide on the design and color scheme for your clay pot lighthouse. You can opt for a classic nautical look with traditional colors like white and red or get creative with your own unique design. Consider the theme of your garden or outdoor space as you make your choices.
Step 2: Paint the Clay Pots
Start by painting each clay pot in the chosen colors. Ensure you cover the entire surface evenly. You may need to apply multiple coats for full coverage, allowing each coat to dry before applying the next. Once the pots are dry, you can add details such as windows, doors, or other decorative elements.
Step 3: Assemble the Base
Take your largest clay pot and flip it upside down. This will serve as the base of your lighthouse. Use a strong adhesive, such as E6000, to secure it in place. Place the wooden dowel or PVC pipe into the drainage hole of the pot. This will be the core structure of your lighthouse. Make sure it’s centered and secure.
Step 4: Stack the Clay Pots
Begin stacking the remaining clay pots on top of the base, with the smallest pot at the very top to form the lighthouse’s tower. Each pot should be secured to the one below it using adhesive, ensuring they are centered and straight. The dowel or PVC pipe should run through the center of all the pots.
Step 5: Create Windows and Doors
Using your acrylic paint, add windows and doors to the pots, creating the appearance of a real lighthouse. You can get creative with your designs, whether they’re simple rectangular shapes or more intricate patterns. Allow the paint to dry before moving on.

Step 6: Add Decorative Elements
Enhance the lighthouse’s appearance by gluing decorative stones, seashells, or other embellishments to the pots. This will give your lighthouse an authentic and charming look. Be sure to let the adhesive dry completely before continuing.
Step 7: Attach the Light Fixture
At the top of your lighthouse, attach the glass or plastic light fixture. This will be the housing for your light source. Make sure it’s securely fastened to the smallest clay pot, and that it’s centered and level.
Step 8: Install the Light Source
Place a solar-powered LED light or a small lantern inside the glass or plastic fixture at the top of your lighthouse. This will serve as the beacon of your lighthouse and provide an attractive illumination effect at night. If you’re using a solar light, make sure it has access to sunlight during the day for charging.
Step 9: Seal and Protect Your Lighthouse
To ensure your clay pot lighthouse withstands the elements, apply a clear sealer over the entire structure. This will protect the paint and keep your lighthouse looking great for years to come. Make sure to follow the manufacturer’s instructions for the sealer and allow it to dry completely.
Tips for Choosing the Right Clay Pots for Your Lighthouse
When selecting clay pots for your lighthouse, there are several factors to consider:
1. Size: Choose pots of different sizes to create a tiered effect and give your lighthouse a realistic look. The size of the pots will also determine the overall height and shape of your lighthouse.
2. Shape: Clay pots come in various shapes, such as round, square, or rectangular. Consider the shape that best suits your desired lighthouse design.
3. Material: Clay pots are available in different materials, including terracotta, ceramic, and fiberglass. Terracotta pots are the most common choice for lighthouse projects due to their natural and rustic appearance.
4. Durability: Ensure that the clay pots you choose are sturdy and durable enough to withstand outdoor conditions if you plan to display your lighthouse outside.

Adding a Light to Your Clay Pot Lighthouse
Adding a light source to your clay pot lighthouse will make it even more enchanting, especially when displayed at night. Here are some options for lighting your lighthouse:
1. Solar-powered light: A solar-powered light is an eco-friendly and cost-effective option. These lights charge during the day using sunlight and automatically turn on at night. They are easy to install and require minimal maintenance.
2. Battery-operated LED light: If you prefer more control over the lighting, a battery-operated LED light is a great choice. These lights come in various colors and can be easily turned on and off as needed. They require regular battery replacement or recharging.
3. Fairy lights: For a whimsical and magical effect, consider using fairy lights to illuminate your lighthouse. These tiny lights can be wrapped around the structure or placed inside the pots to create a soft and enchanting glow.
When installing the light source, make sure it is positioned correctly to illuminate the lighthouse effectively. Follow the manufacturer’s instructions for installation and ensure that the light is securely attached.
Maintenance and Care for Your Clay Pot Lighthouse
To keep your clay pot lighthouse looking new and vibrant, regular maintenance and care are necessary. Here are some tips:
1. Cleaning: Clean the lighthouse periodically to remove any dirt, dust, or debris that may accumulate over time. Use a soft cloth or sponge and mild soap to gently wipe the surface of the pots. Avoid using abrasive cleaners or scrub brushes that may damage the paint.
2. Repairs: Inspect the lighthouse regularly for any signs of damage or wear. If any parts become loose or detached, reattach them using adhesive or epoxy glue. Touch up any chipped or faded paint to maintain its appearance.
3. Protection: If you display your lighthouse outdoors, consider using a waterproof cover during inclement weather to protect it from rain, snow, or excessive sunlight. This will prevent the paint from fading or peeling and ensure its longevity.
4. Seasonal changes: Depending on your climate, you may need to make adjustments to your lighthouse during different seasons. For example, you may need to remove the light source or cover the lighthouse during winter months to protect it from freezing temperatures.
By following these maintenance tips, you can keep your clay pot lighthouse looking beautiful and vibrant for years to come.

Conclusion
Making a clay pot lighthouse is a fun and creative project that allows you to showcase your artistic skills and add a unique touch to your home or garden. By following the step-by-step guide and considering the tips provided, you can create a beautiful and enchanting lighthouse that will be a focal point of admiration.
The benefits of making a clay pot lighthouse are numerous. It allows you to unleash your creativity, adds a personal touch to your space, and can be a great conversation starter. Whether you choose to display your lighthouse indoors or outdoors, it is sure to bring joy and beauty to your surroundings. Thanks for reading, and we hope this has given you some inspiration on how to make a lighthouse from clay pots!


