Horse hair pottery, an art form rooted in ancient Native American traditions, captures the essence of nature’s beauty through a unique and captivating process. This distinctive pottery style involves the application of horsehair to the clay surface during firing, resulting in delicate and intricate patterns that seem to dance across the vessel. Originating in the Southwest, particularly among the Navajo and Pueblo tribes, horsehair pottery has evolved into a celebrated form of expression, blending tradition with contemporary artistry.
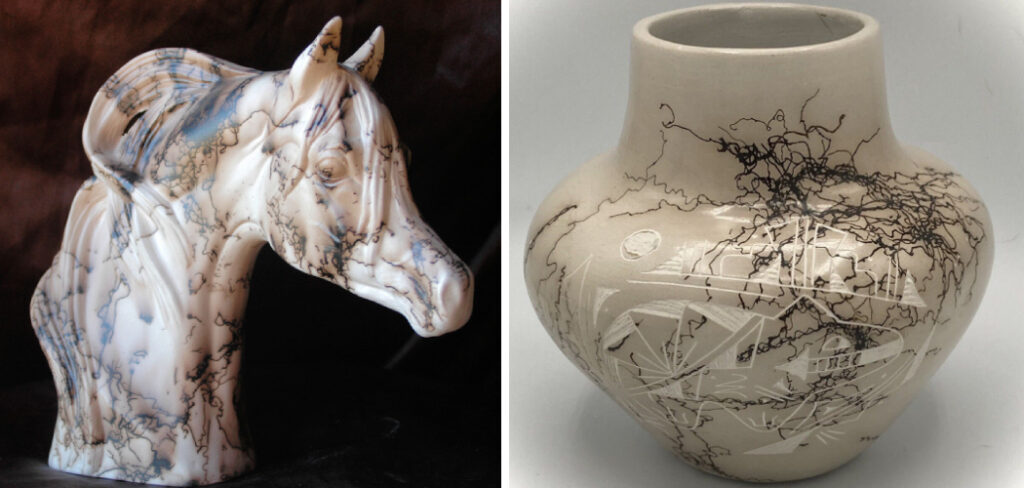
The intricate lines and smoky patterns created by the horsehair’s interaction with the hot surface of the pottery make each piece a one-of-a-kind masterpiece. As we explore the world of horsehair pottery, we’ll uncover the ancient techniques, cultural significance, and the modern resurgence of this art form, showcasing how it continues to captivate admirers with its timeless allure and connection to the rich heritage of Native American craftsmanship.
Table of Contents
What Is Horse Hair Pottery
Horse hair pottery is a unique and beautiful form of ceramic art that has been practiced for centuries. It originated from the Pueblo people of the American Southwest, specifically in the Zuni and Navajo tribes. The technique involves using strands of horse hair to create intricate designs on pottery, resulting in one-of-a-kind pieces that are highly valued by collectors and art enthusiasts.
Horse hair pottery is typically made from a special type of clay that can withstand extremely high temperatures, making it suitable for the firing process. After the potter creates a vessel or other ceramic object, it is placed in a kiln and fired at around 1800°F. Once the piece has reached the desired temperature, it is removed from the kiln and still hot, strands of horse hair are carefully laid on the surface. The heat from the pottery causes the hair to singe and create unique patterns and designs on the piece.
The use of horse hair in pottery is significant as it connects the art form to nature and represents a sacred relationship between humans and animals. In Native American culture, horses are considered spiritual beings that symbolize strength, freedom, and power. By incorporating horse hair into their pottery, the Pueblo people pay homage to these sacred animals and honor their connection to the natural world.
9 Steps How to Make Horse Hair Pottery
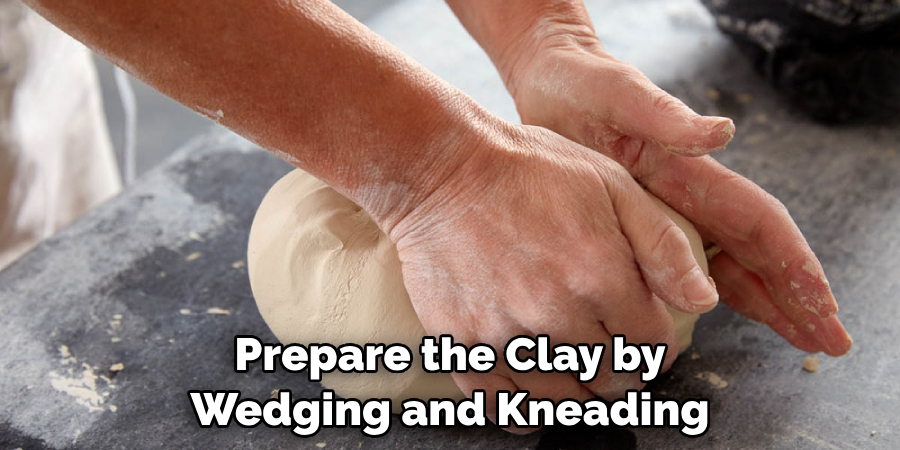
Step 1: Preparing the Clay
Prepare the clay by wedging and kneading it thoroughly to eliminate air bubbles and ensure a consistent texture. Consider the type of clay you’re using, as different clays have distinct firing and working characteristics. Roll out the clay into a slab or throw it on a potter’s wheel to create the desired shape for your pottery piece.
Step 2: Designing the Pottery
Use your artistic vision and creativity to design the pottery piece. Whether you’re creating a bowl, vase, or sculpture, incorporate elements that complement the horsehair firing process. Consider adding texture, patterns, or relief designs that will enhance the final appearance of the pottery.
Step 3: Drying the Pottery
Allow the designed pottery to dry slowly and evenly to prevent cracking. Cover the piece with plastic or damp cloths during the drying process to control moisture loss. This slow drying phase is crucial for preventing structural weaknesses in the clay that could affect the final firing.
Step 4: Bisque Firing
Once the pottery is completely dry, subject it to the first firing, known as the bisque firing. This firing removes any remaining water from the clay and prepares it for the horsehair firing. The kiln should be heated gradually to around 1800°F (982°C), and the pottery should be fired until it turns porous but not fully vitrified.
Step 5: Preparing for Horsehair Application
After the bisque firing, carefully examine the pottery for any imperfections or irregularities. Smooth out any rough edges or surfaces, and clean the piece thoroughly. Before applying horsehair, the pottery must be at the right temperature—typically around 1300-1400°F (704-760°C). Preheat the pottery in the kiln to achieve this optimal temperature.
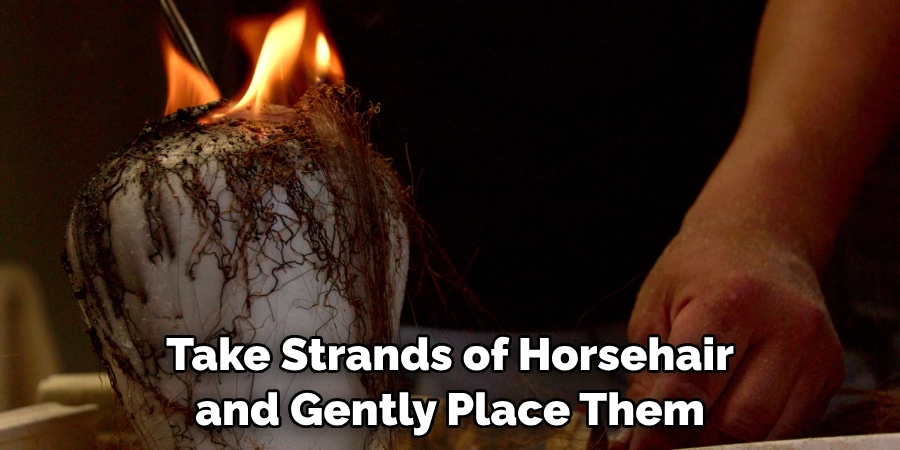
Step 6: Applying Horsehair
Wearing protective gear, carefully position the pottery piece on the kiln shelf. Take strands of horsehair and gently place them onto the hot pottery surface. The horsehair will instantly burn, creating intricate and random patterns on the clay. Experiment with the placement and density of horsehair to achieve different effects.
Step 7: Cooling the Pottery
Allow the horsehair-adorned pottery to cool gradually inside the kiln. Avoid rapid cooling, as it can lead to thermal shock and damage the piece. The slow cooling process is essential for the clay to retain the delicate patterns created by the horsehair.
Step 8: Post-Firing Inspection
Once the pottery has cooled completely, carefully inspect it for the desired patterns and effects created by the horsehair. If the results are satisfactory, proceed to the final steps. If not, assess the factors that might have influenced the outcome, such as the type of clay, firing temperature, or horsehair placement.
Step 9: Finishing Touches
Complete the horsehair pottery by applying a thin layer of transparent glaze if desired. This step enhances the final appearance, adds a protective layer, and brings out the natural colors of the clay. After glazing, the pottery is ready for the final firing, ensuring durability and a polished finish.
Things to Consider When Getting Started with Horse
Horse hair pottery is a beautiful and unique form of art that has been around for centuries. It involves using horse hair to create intricate patterns on clay pots, creating a one-of-a-kind piece that can be used as both functional kitchenware and decorative pieces. If you are interested in getting started with this craft, here are some things to consider.
Materials
Before you begin your horse hair pottery journey, it’s important to have all the necessary materials. This includes clay, horse hair, a kiln, and various tools such as carving knives and brushes. It’s also helpful to have access to a potter’s wheel for shaping the pots. Make sure to do your research on different types of clay and their firing temperatures to ensure the best results. Additionally, you can experiment with different types of horse hair such as mane or tail hair for unique results.
Firing Process
Horse hair pottery involves a unique firing process that requires some practice to master. After shaping your pot on the wheel and letting it dry, it is then fired in a kiln at a specific temperature. Once the pot reaches this temperature, it is quickly removed from the kiln and horse hair is placed on top of it, creating an intricate pattern as the hair burns onto the surface of the clay. This process requires precision and timing to achieve the desired results.
Safety Precautions
It’s important to take proper safety precautions when working with a kiln and hot clay. Always wear protective gear such as gloves and aprons to avoid burns. It’s also important to have proper ventilation in your workspace to avoid inhaling fumes from the firing process. Make sure to read and follow all safety instructions before operating the kiln.

Conclusion
Horsehair pottery is an interesting and unique form of art that can help bring a bit of history into your home. It’s certainly a labor of love to make, taking time and plenty of practice, but it can be well worth the effort when you see the results. The distinctive designs created by burning the horsehairs onto the pottery add a texture quite unlike any other that you’ll want to try out for yourself.
Use this guide as a reference when making your own creations, and don’t forget to have fun while doing it. You may even surprise yourself by putting together pieces with beautiful detail and color combinations that are truly one-of-a-kind. Now that you know more about how to make horse hair pottery, why not get started?! Don’t wait – jump in right now and explore this fascinating craft!


