Yes, you can paint over the ceramic glaze. Proper preparation and the right materials are essential for a successful finish.
Painting over ceramic glaze requires careful preparation. Start by cleaning the surface to remove any dirt or grease. Lightly sand the glazed surface to help the paint adhere better. Use a primer designed for glossy surfaces to ensure a smooth base.
Choose high-quality, durable paint that can withstand moisture and wear. This process can rejuvenate old tiles or ceramics, giving them a fresh, updated look. Whether for a DIY project or professional renovation, painting over ceramic glaze is a cost-effective way to transform your space.

Table of Contents
Credit: www.reddit.com
The Ceramic Glaze Conundrum
Many people ask, “Can you paint over ceramic glaze?” The answer is not simple. Ceramic glaze is a tough, glossy finish. It resists stains and water. This makes it hard to paint over. But with the right steps, it is possible.
Myths And Misconceptions
There are many myths about painting over ceramic glaze. Some say it is impossible. Others think it is too easy. The truth lies in the middle. You need to prepare the surface well. Using the right paint is also crucial.
What Is Ceramic Glaze?
Ceramic glaze is a glass-like coating. It is applied to ceramics. This glaze makes the surface shiny and smooth. It also protects the ceramic from damage. Glaze is often found on tiles, dishes, and pottery.
| Myth | Reality |
|---|---|
| Painting over glaze is impossible. | It is possible with the right prep. |
| Any paint will work. | Special paint is needed. |
| No need to sand the glaze. | Sanding is essential for adhesion. |
- Surface Preparation: Clean the surface thoroughly.
- Sanding: Sand the glaze to create a rough surface.
- Primer: Apply a bonding primer.
- Paint: Use epoxy or acrylic paint.
- Clean the ceramic surface with soap and water.
- Sand the glazed surface lightly.
- Apply a bonding primer to the surface.
- Paint with epoxy or acrylic paint.
- Allow the paint to dry completely.

Credit: susan-snyder.blogspot.com
Paint Compatibility With Ceramic
Can you paint over ceramic glaze? The answer is yes, but you need the right type of paint. Understanding paint compatibility is essential for a lasting finish. Here, we will explore the types of paints you can use and factors affecting paint adhesion.
Types Of Paints Used On Ceramics
Not all paints work well on ceramics. Here are the most common types:
- Acrylic Paint: Versatile and easy to find. Best for small projects.
- Epoxy Paint: Durable and resistant to moisture. Ideal for high-use items.
- Enamel Paint: Provides a glossy finish. Great for decorative pieces.
Factors Affecting Paint Adhesion
Several factors can affect how well paint sticks to ceramic:
- Surface Preparation: Clean the ceramic thoroughly. Remove dirt and grease.
- Primer Use: Apply a ceramic primer. This helps the paint adhere better.
- Drying Time: Allow each coat to dry fully. This ensures a smooth finish.
- Type of Ceramic: Porous ceramics hold paint better. Glazed surfaces need extra preparation.
Proper preparation and choosing the right paint are key. Follow these tips for a successful project.
Surface Preparation Secrets
Painting over ceramic glaze can transform old tiles into modern designs. But to achieve a flawless finish, surface preparation is key. Proper preparation ensures that the paint adheres well and lasts long. Let’s explore the essential steps for prepping your ceramic surface.
Cleaning The Ceramic Surface
Start by cleaning the ceramic surface thoroughly. Dust, grease, and grime can prevent the paint from sticking. Use a mixture of warm water and mild detergent. Scrub the surface gently with a sponge. Rinse the tiles well and let them dry completely.
| Cleaning Supplies | Purpose |
|---|---|
| Mild Detergent | Removes grease and grime |
| Sponge | Scrubs the surface |
| Warm Water | Rinses off soap |
For stubborn stains, consider using a ceramic cleaner. Always wear gloves to protect your hands. Once clean, the surface is ready for the next step.
Sanding For Better Adhesion
Sanding the ceramic surface helps the paint to stick better. Use fine-grit sandpaper, around 220 grit. Sand the tiles gently in a circular motion. This creates a slightly rough texture.
- Use fine-grit sandpaper (220 grit)
- Sand in a circular motion
- Wipe off dust with a damp cloth
After sanding, wipe the surface with a damp cloth. This removes any dust particles. Let the tiles dry completely before applying any primer or paint.
Surface preparation is crucial for a lasting paint job. Follow these steps to ensure your ceramic tiles look stunning and last longer.
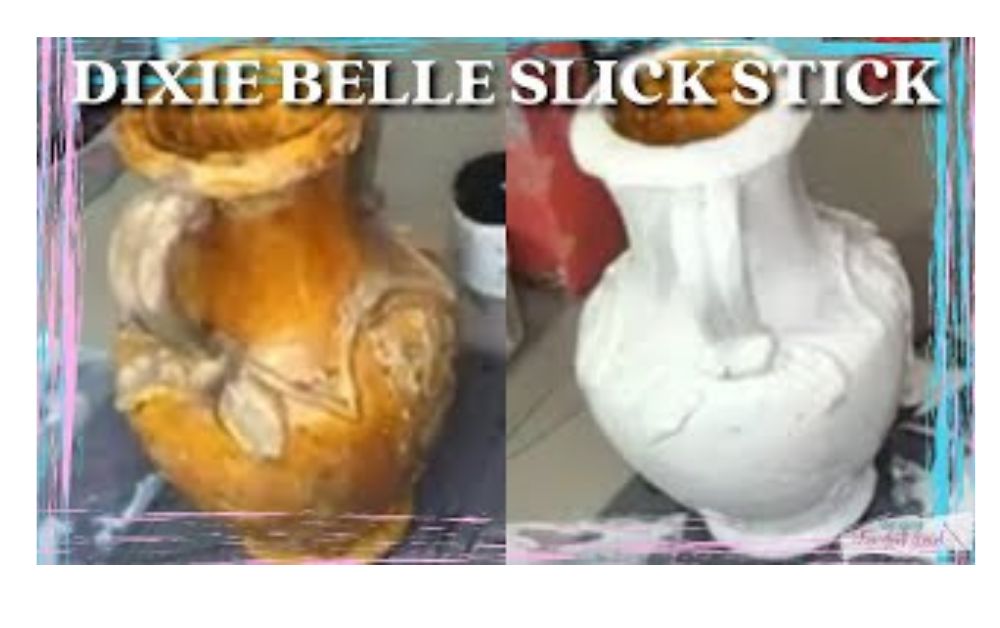
Priming Techniques For Ceramics
Painting over ceramic glaze can be challenging. Proper priming ensures long-lasting and beautiful results. Priming ceramic surfaces requires specific techniques. This section covers the essential steps for success.
Selecting The Right Primer
Choosing the right primer is crucial. Not all primers work well on ceramic surfaces. Epoxy-based primers adhere best to glazed ceramics. These primers are durable and provide a smooth base for paint.
Another good option is a shellac-based primer. It sticks well to glossy surfaces and dries quickly. You can also use a bonding primer. This type is designed to adhere to slick, non-porous surfaces like glazed ceramics.
Always read the product label. Make sure it mentions compatibility with ceramics. This ensures you select the correct primer for your project.
Application Tips For Durability
Proper application of primer ensures a durable finish. Follow these tips for best results:
- Clean the Surface: Remove dirt and grease with soap and water.
- Lightly Sand: Use fine-grit sandpaper to roughen the glaze.
- Wipe Down: Clean the surface with a damp cloth. Let it dry completely.
- Apply Primer Evenly: Use a brush or roller. Apply thin, even coats.
- Allow to Dry: Follow drying times on the primer label.
- Reapply if Needed: Some projects need a second coat.
By following these steps, your paint will adhere better. The finish will be smooth and long-lasting.
Step-by-step Painting Guide
Painting over ceramic glaze can give your items a fresh look. Follow this guide to achieve the best results. We’ll cover everything from choosing the right brushes to layering the paint.
Choosing Brushes And Tools
Pick the right brushes and tools to get a smooth finish. Here are the essentials:
- Small Detail Brushes: These are perfect for intricate designs.
- Medium Flat Brushes: Use these for broader strokes.
- Sponge Brushes: Great for even coverage on large areas.
- Painter’s Tape: Helps create clean edges.
- Sandpaper: Use fine-grit to lightly sand the surface.
Layering Paint On Ceramic
Layering paint properly ensures a durable and beautiful finish. Follow these steps:
- Clean the Surface: Use soap and water to remove dirt.
- Sand the Glaze: Lightly sand the ceramic to help the paint stick.
- Prime the Ceramic: Apply a thin coat of primer and let it dry.
- First Paint Layer: Use a base color and let it dry completely.
- Add More Layers: Apply additional coats for vibrant color.
- Seal the Paint: Use a clear sealant to protect your work.
Follow this guide to ensure your painted ceramic items look stunning. Happy painting!
Drying And Curing Process
Painting over a ceramic glaze requires patience. The drying and curing process is crucial. It ensures the paint adheres properly and lasts long. Rushing this step can lead to peeling and chipping. Understanding the optimal conditions and timeframes helps achieve the best results.
Optimal Drying Conditions
The right environment helps the paint dry evenly. Aim for a room temperature of 70°F (21°C). Ensure good ventilation to prevent moisture buildup. Avoid painting in high humidity or extreme temperatures. These conditions can affect the drying process.
Avoid direct sunlight on the painted surface. It can cause uneven drying and cracks. Use fans or dehumidifiers if needed. This ensures the paint dries properly.
Follow these tips for the best drying conditions:
- Maintain a steady room temperature.
- Ensure good air circulation.
- Avoid high humidity and extreme temperatures.
- Keep the surface out of direct sunlight.
Timeframes For Curing Paint
The curing process takes longer than drying. It is essential for paint durability. Curing allows the paint to harden and set fully.
Here is a general timeframe for curing:
| Paint Type | Initial Drying Time | Full Curing Time |
|---|---|---|
| Latex Paint | 1-2 hours | 2-3 weeks |
| Oil-based Paint | 6-8 hours | 7-10 days |
| Enamel Paint | 4-6 hours | 1-2 weeks |
Latex paint dries quickly but takes longer to cure. Oil-based paint needs more drying time but cures faster. Enamel paint falls in between.
To ensure proper curing:
- Wait for the initial drying time before handling.
- Allow the full curing time for the paint to harden.
- Keep the painted item in optimal conditions during curing.
Patience pays off with a durable and beautiful finish.
Sealing For Longevity
Painting over ceramic glaze can transform your space. But, to ensure your hard work lasts, you need to seal it properly. Sealing helps protect the painted surface from scratches, water, and wear. By choosing the right sealant and applying it correctly, your painted ceramics will look fresh for years.
Types Of Sealants
There are different types of sealants available. Each type offers unique benefits. Below is a table summarizing the main types of sealants:
| Type of Sealant | Benefits | Best Used For |
|---|---|---|
| Polyurethane | Durable and provides a glossy finish | High-traffic areas |
| Acrylic | Dries quickly and is easy to apply | Indoor projects |
| Epoxy | Extremely strong and water-resistant | Outdoor projects |
Sealing Best Practices
To ensure your sealant works effectively, follow these best practices:
- Clean the painted surface thoroughly before sealing.
- Ensure the paint is completely dry.
- Apply the sealant in thin, even layers.
- Allow each layer to dry before applying the next.
- Use a high-quality brush or roller for application.
Following these steps will help you achieve a long-lasting finish. Sealants protect your painted ceramics and keep them looking new. Remember, the right sealant makes all the difference!
Troubleshooting Common Issues
Painting over ceramic glaze can sometimes lead to issues. Let’s troubleshoot common problems. This guide will help you fix them.
Paint Bubbling And Peeling
Paint bubbling and peeling can ruin your project. These issues often occur because of surface preparation mistakes. Here are steps to fix them:
- Clean the surface thoroughly. Use a mild detergent and water.
- Sand the glazed surface with fine-grit sandpaper. This helps the paint stick.
- Apply a primer designed for slick surfaces. Let it dry fully.
- Paint in thin layers. Thick layers may bubble or peel.
- Allow each layer to dry before adding another coat.
Follow these steps to avoid bubbling and peeling. Your painted ceramic will look smooth and flawless.
Fixing Uneven Coatings
Uneven coatings are another common problem. They make the surface look patchy. Here’s how to fix it:
- Stir the paint well before using. This ensures even pigment distribution.
- Use a quality brush or roller. Cheap tools can cause streaks.
- Apply thin, even coats. Thick coats can dry unevenly.
- Sand between coats lightly. This helps each layer stick better.
- Check for missed spots in good lighting. Touch them up as needed.
Following these tips will help you achieve a smooth, even finish.
Inspirational Ceramic Painting Projects
Ceramic painting is an exciting art form. It allows you to transform everyday items into unique pieces. You can paint over ceramic glaze to create stunning art. Let’s explore some inspiring ceramic painting projects.
Showcasing Creative Examples
Here are some creative examples of ceramic painting projects:
- Floral Designs: Paint beautiful flowers on ceramic plates. Use vibrant colors.
- Geometric Patterns: Create bold, geometric designs on mugs. Use contrasting shades.
- Animal Motifs: Add cute animal designs to tiles. Perfect for kids’ rooms.
- Abstract Art: Experiment with abstract patterns on vases. Let your creativity flow.
- Personalized Gifts: Paint names or messages on ceramic items. Make them special for loved ones.
Tips From Expert Ceramic Artists
Expert ceramic artists share these tips for painting over ceramic glaze:
- Preparation: Clean the ceramic surface thoroughly. Remove any dust and grease.
- Priming: Apply a ceramic primer. It helps the paint adhere better.
- Choosing Paints: Use acrylic or enamel paints. They are durable and vibrant.
- Brush Selection: Choose fine brushes for detailed work. Use broader brushes for larger areas.
- Layering: Apply multiple thin layers of paint. It ensures an even finish.
- Sealing: Use a clear sealer after painting. It protects your artwork.
Follow these tips to achieve beautiful results. Enjoy the process of creating your ceramic art. Let your imagination guide you.
Credit: www.sisterhoodofthetravelingbrush.com
Frequently Asked Questions
Can You Paint Over Ceramic Glaze?
Yes, you can paint over ceramic glaze. Proper surface preparation is essential. Clean, sand, and use a bonding primer. Choose suitable paint.
What Paint Works On Ceramic Glaze?
Acrylic paint is ideal for ceramic glaze. It’s durable and provides good coverage. Use a bonding primer for better adhesion.
Do I Need To Sand Ceramic Glaze Before Painting?
Yes, sanding ceramic glaze is crucial. It roughens the surface, ensuring better paint adhesion. Use fine-grit sandpaper.
How Do You Prepare Ceramic Glaze For Painting?
Clean the ceramic thoroughly. Sand the surface lightly. Apply a bonding primer. Ensure the primer dries completely before painting.
Conclusion
Painting over ceramic glaze is possible with proper preparation and materials. Clean the surface thoroughly and use a high-quality primer. Choose the right paint designed for ceramics to ensure durability. With these steps, you can transform your ceramic items, giving them a fresh, new look.
Happy painting!


